
This text will present you easy methods to set up and use Home windows-based software program that may prepare Hunyuan video LoRA fashions, permitting the person to generate customized personalities within the Hunyuan Video basis mannequin:
Click on to play. Examples from the latest explosion of celeb Hunyuan LoRAs from the civit.ai group.
In the meanwhile the 2 hottest methods of producing Hunyuan LoRA fashions domestically are:
1) The diffusion-pipe-ui Docker-based framework, which depends on Home windows Subsystem for Linux (WSL) to deal with a few of the processes.
2) Musubi Tuner, a brand new addition to the favored Kohya ss diffusion coaching structure. Musubi Tuner doesn’t require Docker and doesn’t rely upon WSL or different Linux-based proxies – however it may be troublesome to get operating on Home windows.
Due to this fact this run-through will deal with Musubi Tuner, and on offering a very native resolution for Hunyuan LoRA coaching and technology, with out using API-driven web sites or business GPU-renting processes corresponding to Runpod.
Click on to play. Samples from LoRA coaching on Musubi Tuner for this text. All permissions granted by the particular person depicted, for the needs of illustrating this text.
REQUIREMENTS
The set up would require at minimal a Home windows 10 PC with a 30+/40+ sequence NVIDIA card that has not less than 12GB of VRAM (although 16GB is advisable). The set up used for this text was examined on a machine with 64GB of system RAM and a NVIDIA 3090 graphics playing cards with 24GB of VRAM. It was examined on a devoted test-bed system utilizing a contemporary set up of Home windows 10 Skilled, on a partition with 600+GB of spare disk house.
WARNING
Putting in Musubi Tuner and its conditions additionally entails the set up of developer-focused software program and packages instantly onto the principle Home windows set up of a PC. Taking the set up of ComfyUI under consideration, for the top levels, this venture would require round 400-500 gigabytes of disk house. Although I’ve examined the process with out incident a number of occasions in newly-installed take a look at mattress Home windows 10 environments, neither I nor unite.ai are accountable for any injury to techniques from following these directions. I counsel you to again up any essential knowledge earlier than trying this sort of set up process.
Concerns
Is This Technique Nonetheless Legitimate?
The generative AI scene is shifting very quick, and we will anticipate higher and extra streamlined strategies of Hunyuan Video LoRA frameworks this yr.
…and even this week! Whereas I used to be writing this text, the developer of Kohya/Musubi produced musubi-tuner-gui, a complicated Gradio GUI for Musubi Tuner:

Clearly a user-friendly GUI is preferable to the BAT information that I take advantage of on this function – as soon as musubi-tuner-gui is working. As I write, it solely went on-line 5 days in the past, and I can discover no account of anybody efficiently utilizing it.
In accordance with posts within the repository, the brand new GUI is meant to be rolled instantly into the Musubi Tuner venture as quickly as attainable, which is able to finish its present existence as a standalone GitHub repository.
Based mostly on the current set up directions, the brand new GUI will get cloned instantly into the present Musubi digital surroundings; and, regardless of many efforts, I can’t get it to affiliate with the present Musubi set up. Because of this when it runs, it should discover that it has no engine!
As soon as the GUI is built-in into Musubi Tuner, problems with this sort will certainly be resolved. Although the creator concedes that the brand new venture is ‘actually tough’, he’s optimistic for its improvement and integration instantly into Musubi Tuner.
Given these points (additionally regarding default paths at install-time, and using the UV Python package deal, which complicates sure procedures within the new launch), we are going to most likely have to attend just a little for a smoother Hunyuan Video LoRA coaching expertise. That mentioned, it seems very promising!
However if you cannot wait, and are keen to roll your sleeves up a bit, you may get Hunyuan video LoRA coaching operating domestically proper now.
Let’s get began.
Why Set up Something on Naked Steel?
(Skip this paragraph if you happen to’re not a complicated person)
Superior customers will surprise why I’ve chosen to put in a lot of the software program on the naked metallic Home windows 10 set up as an alternative of in a digital surroundings. The reason being that the important Home windows port of the Linux-based Triton package deal is much tougher to get working in a digital surroundings. All the opposite bare-metal installations within the tutorial couldn’t be put in in a digital surroundings, as they need to interface instantly with native {hardware}.
Putting in Prerequisite Packages and Packages
For the applications and packages that have to be initially put in, the order of set up issues. Let’s get began.
1: Obtain Microsoft Redistributable
Obtain and set up the Microsoft Redistributable package deal from https://aka.ms/vs/17/launch/vc_redist.x64.exe.
It is a simple and speedy set up.

2: Set up Visible Studio 2022
Obtain the Microsoft Visible Studio 2022 Group version from https://visualstudio.microsoft.com/downloads/?cid=learn-onpage-download-install-visual-studio-page-cta
Begin the downloaded installer:

We do not want each out there package deal, which might be a heavy and prolonged set up. On the preliminary Workloads web page that opens, tick Desktop Growth with C++ (see picture under).

Now click on the Particular person Parts tab on the top-left of the interface and use the search field to search out ‘Home windows SDK’.

By default, solely the Home windows 11 SDK is ticked. If you’re on Home windows 10 (this set up process has not been examined by me on Home windows 11), tick the newest Home windows 10 model, indicated within the picture above.
Seek for ‘C++ CMake’ and examine that C++ CMake instruments for Home windows is checked.

This set up will take not less than 13 GB of house.

As soon as Visible Studio has put in, it should try and run in your pc. Let it open absolutely. When the Visible Studio’s full-screen interface is lastly seen, shut this system.
3: Set up Visible Studio 2019
A number of the subsequent packages for Musubi expect an older model of Microsoft Visible Studio, whereas others want a more moderen one.
Due to this fact additionally obtain the free Group version of Visible Studio 19 both from Microsoft (https://visualstudio.microsoft.com/vs/older-downloads/ – account required) or Techspot (https://www.techspot.com/downloads/7241-visual-studio-2019.html).
Set up it with the identical choices as for Visible Studio 2022 (see process above, besides that Home windows SDK is already ticked within the Visible Studio 2019 installer).
You will see that the Visible Studio 2019 installer is already conscious of the newer model because it installs:

When set up is full, and you’ve got opened and closed the put in Visible Studio 2019 software, open a Home windows command immediate (Sort CMD in Begin Search) and kind in and enter:
the place cl
The outcome must be the recognized places of the 2 put in Visible Studio editions.

When you as an alternative get INFO: Couldn't discover information for the given sample(s), see the Examine Path part of this text under, and use these directions so as to add the related Visible Studio paths to Home windows surroundings.
Save any modifications made in response to the Examine Paths part under, after which attempt the the place cl command once more.
4: Set up CUDA 11 + 12 Toolkits
The assorted packages put in in Musubi want totally different variations of NVIDIA CUDA, which accelerates and optimizes coaching on NVIDIA graphics playing cards.
The explanation we put in the Visible Studio variations first is that the NVIDIA CUDA installers seek for and combine with any present Visible Studio installations.
Obtain an 11+ sequence CUDA set up package deal from:
https://developer.nvidia.com/cuda-11-8-0-download-archive?target_os=Home windows&target_arch=x86_64&target_version=11&target_type=exe_local (obtain ‘exe (native’) )
Obtain a 12+ sequence CUDA Toolkit set up package deal from:
https://developer.nvidia.com/cuda-downloads?target_os=Home windows&target_arch=x86_64
The set up course of is an identical for each installers. Ignore any warnings in regards to the existence or non-existence of set up paths in Home windows Surroundings variables – we’re going to attend to this manually later.
Set up NVIDIA CUDA Toolkit V11+
Begin the installer for the 11+ sequence CUDA Toolkit.


At Set up Choices, select Customized (Superior) and proceed.

Uncheck the NVIDIA GeForce Expertise possibility and click on Subsequent.

Go away Choose Set up Location at defaults (that is essential):

Click on Subsequent and let the set up conclude.

Ignore any warning or notes that the installer offers about Nsight Visible Studio integration, which isn’t wanted for our use case.
Set up NVIDIA CUDA Toolkit V12+
Repeat your complete course of for the separate 12+ NVIDIA Toolkit installer that you simply downloaded:

The set up course of for this model is an identical to the one listed above (the 11+ model), apart from one warning about surroundings paths, which you’ll be able to ignore:

When the 12+ CUDA model set up is accomplished, open a command immediate in Home windows and kind and enter:
nvcc --version
This could affirm details about the put in driver model:

To examine that your card is acknowledged, kind and enter:
nvidia-smi

5: Set up GIT
GIT will likely be dealing with the set up of the Musubi repository in your native machine. Obtain the GIT installer at:
https://git-scm.com/downloads/win (’64-bit Git for Home windows Setup’)

Run the installer:

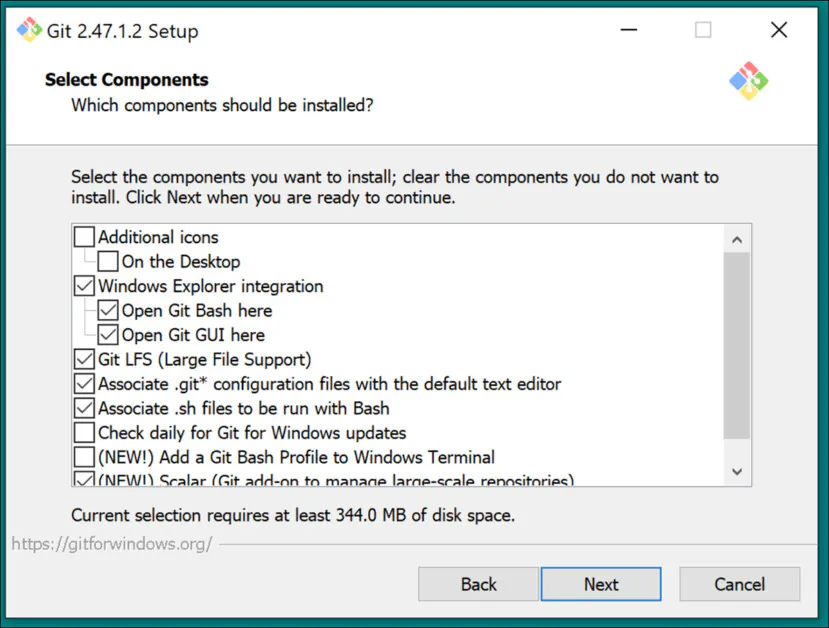
Use default settings for Choose Parts:
Go away the default editor at Vim:

Let GIT determine about department names:

Use advisable settings for the Path Surroundings:

Use advisable settings for SSH:

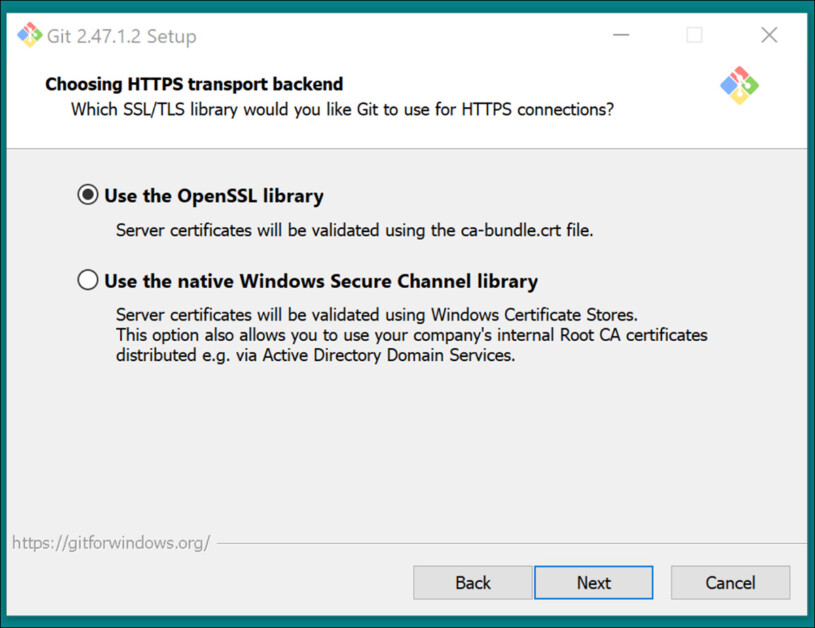
Use advisable settings for HTTPS Transport backend:
Use advisable settings for line-ending conversions:

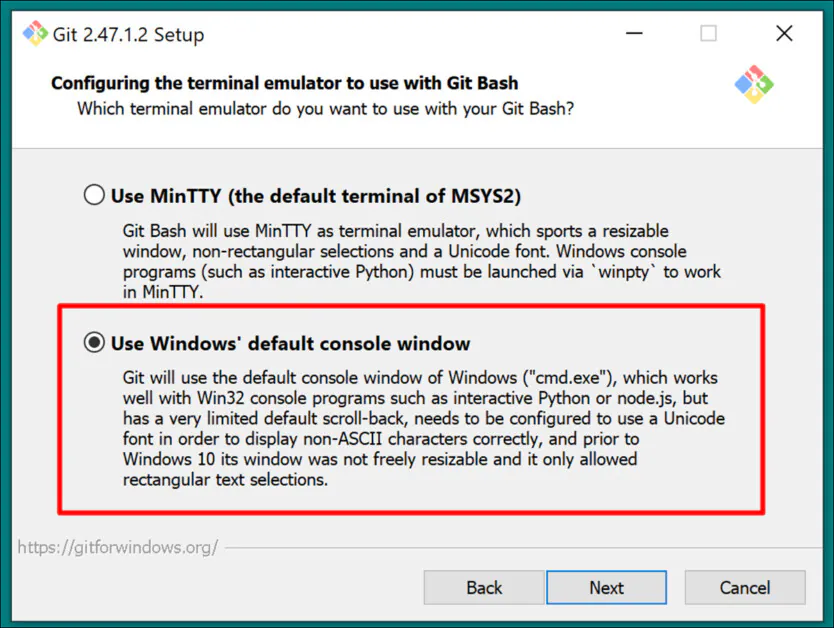
Select Home windows default console because the Terminal Emulator:
Use default settings (Quick-forward or merge) for Git Pull:

Use Git-Credential Supervisor (the default setting) for Credential Helper:

In Configuring additional choices, depart Allow file system caching ticked, and Allow symbolic hyperlinks unticked (until you’re a complicated person who’s utilizing exhausting hyperlinks for a centralized mannequin repository).

Conclude the set up and take a look at that Git is put in correctly by opening a CMD window and typing and coming into:
git --version

GitHub Login
Later, while you try and clone GitHub repositories, you might be challenged on your GitHub credentials. To anticipate this, log into your GitHub account (create one, if vital) on any browsers put in in your Home windows system. On this manner, the 0Auth authentication technique (a pop-up window) ought to take as little time as attainable.
After that preliminary problem, it’s best to keep authenticated routinely.
6: Set up CMake
CMake 3.21 or newer is required for elements of the Musubi set up course of. CMake is a cross-platform improvement structure able to orchestrating various compilers, and of compiling software program from supply code.
Obtain it at:
https://cmake.org/obtain/ (‘Home windows x64 Installer’)
Launch the installer:

Guarantee Add Cmake to the PATH surroundings variable is checked.

Press Subsequent.

Sort and enter this command in a Home windows Command immediate:
cmake --version
If CMake put in efficiently, it should show one thing like:
cmake model 3.31.4CMake suite maintained and supported by Kitware (kitware.com/cmake).

7: Set up Python 3.10
The Python interpreter is central to this venture. Obtain the three.10 model (one of the best compromise between the totally different calls for of Musubi packages) at:
https://www.python.org/downloads/launch/python-3100/ (‘Home windows installer (64-bit)’)
Run the obtain installer, and depart at default settings:
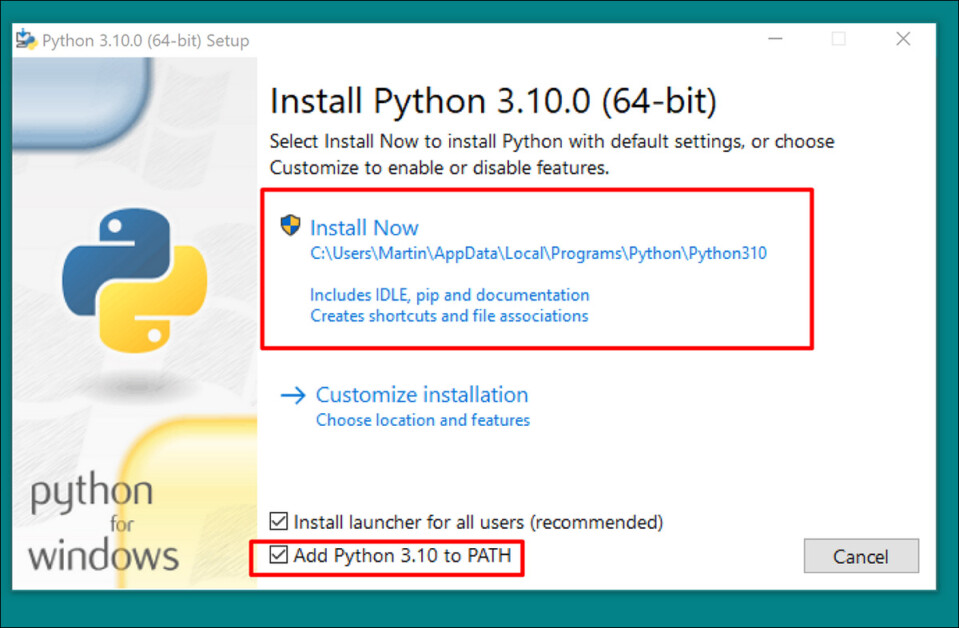

On the finish of the set up course of, click on Disable path size restrict (requires UAC admin affirmation):

In a Home windows Command immediate kind and enter:
python --version
This could lead to Python 3.10.0

Examine Paths
The cloning and set up of the Musubi frameworks, in addition to its regular operation after set up, requires that its elements know the trail to a number of essential exterior elements in Home windows, significantly CUDA.
So we have to open the trail surroundings and examine that each one the requisites are in there.
A fast technique to get to the controls for Home windows Surroundings is to kind Edit the system surroundings variables into the Home windows search bar.

Clicking this may open the System Properties management panel. Within the decrease proper of System Properties, click on the Surroundings Variables button, and a window known as Surroundings Variables opens up. Within the System Variables panel within the backside half of this window, scroll all the way down to Path and double-click it. This opens a window known as Edit surroundings variables. Drag the width of this window wider so you possibly can see the total path of the variables:

Right here the essential entries are:
C:Program FilesNVIDIA GPU Computing ToolkitCUDAv12.6binC:Program FilesNVIDIA GPU Computing ToolkitCUDAv12.6libnvvpC:Program FilesNVIDIA GPU Computing ToolkitCUDAv11.8binC:Program FilesNVIDIA GPU Computing ToolkitCUDAv11.8libnvvpC:Program Information (x86)Microsoft Visible Studio2019CommunityVCToolsMSVC14.29.30133binHostx64x64C:Program FilesMicrosoft Visible Studio2022CommunityVCToolsMSVC14.42.34433binHostx64x64C:Program FilesGitcmdC:Program FilesCMakebin
Usually, the right path variables ought to already be current.
Add any paths which can be lacking by clicking New on the left of the Edit surroundings variable window and pasting within the appropriate path:

Do NOT simply copy and paste from the paths listed above; examine that every equal path exists in your individual Home windows set up.
If there are minor path variations (significantly with Visible Studio installations), use the paths listed above to search out the right goal folders (i.e., x64 in Host64 in your individual set up. Then paste these paths into the Edit surroundings variable window.
After this, restart the pc.
Putting in Musubi
Improve PIP
Utilizing the newest model of the PIP installer can clean a few of the set up levels. In a Home windows Command immediate with administrator privileges (see Elevation, under), kind and enter:
pip set up --upgrade pip
Elevation
Some instructions could require elevated privileges (i.e., to be run as an administrator). When you obtain error messages about permissions within the following levels, shut the command immediate window and reopen it in administrator mode by typing CMD into Home windows search field, right-clicking on Command Immediate and choosing Run as administrator:

For the following levels, we’re going to use Home windows Powershell as an alternative of the Home windows Command immediate. You will discover this by coming into Powershell into the Home windows search field, and (as vital) right-clicking on it to Run as administrator:

Set up Torch
In Powershell, kind and enter:
pip set up torch torchvision torchaudio --index-url https://obtain.pytorch.org/whl/cu118
Be affected person whereas the numerous packages set up.
When accomplished, you possibly can confirm a GPU-enabled PyTorch set up by typing and coming into:
python -c "import torch; print(torch.cuda.is_available())"
This could lead to:
C:WINDOWSsystem32>python -c "import torch;print(torch.cuda.is_available())"True
Set up Triton for Home windows
Subsequent, the set up of the Triton for Home windows element. In elevated Powershell, enter (on a single line):
pip set up https://github.com/woct0rdho/triton-windows/releases/obtain/v3.1.0-windows.post8/triton-3.1.0-cp310-cp310-win_amd64.whl
(The installer triton-3.1.0-cp310-cp310-win_amd64.whl works for each Intel and AMD CPUs so long as the structure is 64-bit and the surroundings matches the Python model)
After operating, this could lead to:
Efficiently put in triton-3.1.0
We are able to examine if Triton is working by importing it in Python. Enter this command:
python -c "import triton; print('Triton is working')"
This could output:
Triton is working
To examine that Triton is GPU-enabled, enter:
python -c "import torch; print(torch.cuda.is_available())"
This could lead to True:

Create the Digital Surroundings for Musubi
To any extent further, we are going to set up any additional software program right into a Python digital surroundings (or venv). Because of this all you will want to do to uninstall all the next software program is to pull the venv’s set up folder to the trash.
Let’s create that set up folder: make a folder known as Musubi in your desktop. The next examples assume that this folder exists: C:Customers[Your Profile Name]DesktopMusubi.
In Powershell, navigate to that folder by coming into:
cd C:Customers[Your Profile Name]DesktopMusubi
We wish the digital surroundings to have entry to what we have now put in already (particularly Triton), so we are going to use the --system-site-packages flag. Enter this:
python -m venv --system-site-packages musubi
Look forward to the surroundings to be created, after which activate it by coming into:
.musubiScriptsactivate
From this level on, you possibly can inform that you’re within the activated digital surroundings by the truth that (musubi) seems in the beginning of all of your prompts.

Clone the Repository
Navigate to the newly-created musubi folder (which is contained in the Musubi folder in your desktop):
cd musubi
Now that we’re in the fitting place, enter the next command:
git clone https://github.com/kohya-ss/musubi-tuner.git
Look forward to the cloning to finish (it won’t take lengthy).

Putting in Necessities
Navigate to the set up folder:
cd musubi-tuner
Enter:
pip set up -r necessities.txt
Look forward to the numerous installations to complete (this may take longer).

Automating Entry to the Hunyuan Video Venv
To simply activate and entry the brand new venv for future classes, paste the next into Notepad and put it aside with the title activate.bat, saving it with All information possibility (see picture under).
@echo off
name C:Customers[Your Profile Name]DesktopMusubimusubiScriptsactivate
cd C:Customers[Your Profile Name]DesktopMusubimusubimusubi-tuner
cmd
(Substitute [Your Profile Name]with the actual title of your Home windows person profile)

It doesn’t matter into which location you save this file.
To any extent further you possibly can double-click activate.bat and begin work instantly.

Utilizing Musubi Tuner
Downloading the Fashions
The Hunyuan Video LoRA coaching course of requires the downloading of not less than seven fashions with the intention to assist all of the attainable optimization choices for pre-caching and coaching a Hunyuan video LoRA. Collectively, these fashions weigh greater than 60GB.
Present directions for downloading them could be discovered at https://github.com/kohya-ss/musubi-tuner?tab=readme-ov-file#model-download
Nevertheless, these are the obtain directions on the time of writing:
clip_l.safetensors
llava_llama3_fp16.safetensorsllava_llama3_fp8_scaled.safetensors
could be downloaded at:
https://huggingface.co/Cozy-Org/HunyuanVideo_repackaged/tree/most important/split_files/text_encoders
mp_rank_00_model_states.pt
mp_rank_00_model_states_fp8.ptmp_rank_00_model_states_fp8_map.pt
could be downloaded at:
https://huggingface.co/tencent/HunyuanVideo/tree/most important/hunyuan-video-t2v-720p/transformers
pytorch_model.pt
could be downloaded at:
https://huggingface.co/tencent/HunyuanVideo/tree/most important/hunyuan-video-t2v-720p/vae
Although you possibly can place these in any listing you select, for consistency with later scripting, let’s put them in:
C:Customers[Your Profile Name]DesktopMusubimusubimusubi-tunerfashions
That is per the listing association prior up to now. Any instructions or directions hereafter will assume that that is the place the fashions are located; and do not forget to exchange [Your Profile Name] together with your actual Home windows profile folder title.
Dataset Preparation
Ignoring group controversy on the purpose, it is honest to say that you will want someplace between 10-100 images for a coaching dataset on your Hunyuan LoRA. Superb outcomes could be obtained even with 15 photos, as long as the pictures are well-balanced and of excellent high quality.
A Hunyuan LoRA could be skilled each on photos or very quick and low-res video clips, or perhaps a combination of every – though utilizing video clips as coaching knowledge is difficult, even for a 24GB card.
Nevertheless, video clips are solely actually helpful in case your character strikes in such an uncommon manner that the Hunyuan Video basis mannequin won’t learn about it, or be capable of guess.
Examples would come with Roger Rabbit, a xenomorph, The Masks, Spider-Man, or different personalities that possess distinctive attribute motion.
Since Hunyuan Video already is aware of how atypical women and men transfer, video clips aren’t vital to acquire a convincing Hunyuan Video LoRA human-type character. So we’ll use static photos.
Picture Preparation
The Bucket Record
The TLDR model:
It is best to both use photos which can be all the identical dimension on your dataset, or use a 50/50 break up between two totally different sizes, i.e., 10 photos which can be 512x768px and 10 which can be 768x512px.
The coaching may go nicely even if you happen to do not do that – Hunyuan Video LoRAs could be surprisingly forgiving.
The Longer Model
As with Kohya-ss LoRAs for static generative techniques corresponding to Steady Diffusion, bucketing is used to distribute the workload throughout differently-sized photos, permitting bigger photos for use with out inflicting out-of-memory errors at coaching time (i.e., bucketing ‘cuts up’ the pictures into chunks that the GPU can deal with, whereas sustaining the semantic integrity of the entire picture).
For every dimension of picture you embrace in your coaching dataset (i.e., 512x768px), a bucket, or ‘sub-task’ will likely be created for that dimension. So when you have the next distribution of photos, that is how the bucket consideration turns into unbalanced, and dangers that some images will likely be given larger consideration in coaching than others:
2x 512x768px photos
7x 768x512px photos
1x 1000x600px picture
3x 400x800px photos
We are able to see that bucket consideration is split unequally amongst these photos:

Due to this fact both stick to 1 format dimension, or attempt to preserve the distribution of various sizes comparatively equal.
In both case, keep away from very giant photos, as that is more likely to decelerate coaching, to negligible profit.
For simplicity, I’ve used 512x768px for all of the images in my dataset.
Disclaimer: The mannequin (particular person) used within the dataset gave me full permission to make use of these footage for this goal, and exercised approval of all AI-based output depicting her likeness featured on this article.

My dataset consists of 40 photos, in PNG format (although JPG is okay too). My photos had been saved at C:UsersMartinDesktopDATASETS_HUNYUANexamplewoman
It is best to create a cache folder contained in the coaching picture folder:

Now let’s create a particular file that may configure the coaching.
TOML Information
The coaching and pre-caching processes of Hunyuan Video LoRAs obtains the file paths from a flat textual content file with the .toml extension.
For my take a look at, the TOML is situated at C:UsersMartinDesktopDATASETS_HUNYUANtraining.toml
The contents of my coaching TOML appear to be this:
[general]
decision = [512, 768]
caption_extension = ".txt"
batch_size = 1
enable_bucket = true
bucket_no_upscale = false
[[datasets]]
image_directory = "C:CustomersMartinDesktopDATASETS_HUNYUANexamplewoman"
cache_directory = "C:CustomersMartinDesktopDATASETS_HUNYUANexamplewomancache"
num_repeats = 1
(The double back-slashes for picture and cache directories aren’t at all times vital, however they can assist to keep away from errors in circumstances the place there’s a house within the path. I’ve skilled fashions with .toml information that used single-forward and single-backward slashes)
We are able to see within the decision part that two resolutions will likely be thought of – 512px and 768px. It’s also possible to depart this at 512, and nonetheless get hold of good outcomes.
Captions
Hunyuan Video is a textual content+imaginative and prescient basis mannequin, so we’d like descriptive captions for these photos, which will likely be thought of throughout coaching. The coaching course of will fail with out captions.
There are a multitude of open supply captioning techniques we might use for this activity, however let’s preserve it easy and use the taggui system. Although it’s saved at GitHub, and although it does obtain some very heavy deep studying fashions on first run, it comes within the type of a easy Home windows executable that hundreds Python libraries and a simple GUI.
After beginning Taggui, use File > Load Listing to navigate to your picture dataset, and optionally put a token identifier (on this case, examplewoman) that will likely be added to all of the captions:

(Make sure to flip off Load in 4-bit when Taggui first opens – it should throw errors throughout captioning if that is left on)
Choose a picture within the left-hand preview column and press CTRL+A to pick all the pictures. Then press the Begin Auto-Captioning button on the fitting:

You will notice Taggui downloading fashions within the small CLI within the right-hand column, however provided that that is the primary time you will have run the captioner. In any other case you will note a preview of the captions.

Now, every photograph has a corresponding .txt caption with an outline of its picture contents:

You’ll be able to click on Superior Choices in Taggui to extend the size and magnificence of captions, however that’s past the scope of this run-through.
Give up Taggui and let’s transfer on to…
Latent Pre-Caching
To keep away from extreme GPU load at coaching time, it’s essential to create two varieties of pre-cached information – one to signify the latent picture derived from the pictures themselves, and one other to judge a textual content encoding referring to caption content material.
To simplify all three processes (2x cache + coaching), you should use interactive .BAT information that may ask you questions and undertake the processes when you will have given the required data.
For the latent pre-caching, copy the next textual content into Notepad and put it aside as a .BAT file (i.e., title it one thing like latent-precache.bat), as earlier, guaranteeing that the file kind within the drop down menu within the Save As dialogue is All Information (see picture under):
@echo off
REM Activate the digital surroundings
name C:Customers[Your Profile Name]DesktopMusubimusubiScriptsactivate.bat
REM Get person enter
set /p IMAGE_PATH=Enter the trail to the picture listing:
set /p CACHE_PATH=Enter the trail to the cache listing:
set /p TOML_PATH=Enter the trail to the TOML file:
echo You entered:
echo Picture path: %IMAGE_PATH%
echo Cache path: %CACHE_PATH%
echo TOML file path: %TOML_PATH%
set /p CONFIRM=Do you wish to proceed with latent pre-caching (y/n)?
if /i "%CONFIRM%"=="y" (
REM Run the latent pre-caching script
python C:Customers[Your Profile Name]DesktopMusubimusubimusubi-tunercache_latents.py --dataset_config %TOML_PATH% --vae C:Customers[Your Profile Name]DesktopMusubimusubimusubi-tunermodelspytorch_model.pt --vae_chunk_size 32 --vae_tiling
) else (
echo Operation canceled.
)
REM Preserve the window open
pause
(Just remember to change [Your Profile Name] together with your actual Home windows profile folder title)

Now you possibly can run the .BAT file for computerized latent caching:

When prompted to by the assorted questions from the BAT file, paste or kind within the path to your dataset, cache folders and TOML file.
Textual content Pre-Caching
We’ll create a second BAT file, this time for the textual content pre-caching.
@echo off
REM Activate the digital surroundings
name C:Customers[Your Profile Name]DesktopMusubimusubiScriptsactivate.bat
REM Get person enter
set /p IMAGE_PATH=Enter the trail to the picture listing:
set /p CACHE_PATH=Enter the trail to the cache listing:
set /p TOML_PATH=Enter the trail to the TOML file:
echo You entered:
echo Picture path: %IMAGE_PATH%
echo Cache path: %CACHE_PATH%
echo TOML file path: %TOML_PATH%
set /p CONFIRM=Do you wish to proceed with textual content encoder output pre-caching (y/n)?
if /i "%CONFIRM%"=="y" (
REM Use the python executable from the digital surroundings
python C:Customers[Your Profile Name]DesktopMusubimusubimusubi-tunercache_text_encoder_outputs.py --dataset_config %TOML_PATH% --text_encoder1 C:Customers[Your Profile Name]DesktopMusubimusubimusubi-tunermodelsllava_llama3_fp16.safetensors --text_encoder2 C:Customers[Your Profile Name]DesktopMusubimusubimusubi-tunermodelsclip_l.safetensors --batch_size 16
) else (
echo Operation canceled.
)
REM Preserve the window open
pause
Substitute your Home windows profile title and save this as text-cache.bat (or another title you want), in any handy location, as per the process for the earlier BAT file.
Run this new BAT file, observe the directions, and the required text-encoded information will seem within the cache folder:

Coaching the Hunyuan Video Lora
Coaching the precise LoRA will take significantly longer than these two preparatory processes.
Although there are additionally a number of variables that we might fear about (corresponding to batch dimension, repeats, epochs, and whether or not to make use of full or quantized fashions, amongst others), we’ll save these concerns for an additional day, and a deeper have a look at the intricacies of LoRA creation.
For now, let’s decrease the alternatives just a little and prepare a LoRA on ‘median’ settings.
We’ll create a 3rd BAT file, this time to provoke coaching. Paste this into Notepad and put it aside as a BAT file, like earlier than, as coaching.bat (or any title you please):
@echo off
REM Activate the digital surroundings
name C:Customers[Your Profile Name]DesktopMusubimusubiScriptsactivate.bat
REM Get person enter
set /p DATASET_CONFIG=Enter the trail to the dataset configuration file:
set /p EPOCHS=Enter the variety of epochs to coach:
set /p OUTPUT_NAME=Enter the output mannequin title (e.g., example0001):
set /p LEARNING_RATE=Select studying price (1 for 1e-3, 2 for 5e-3, default 1e-3):
if "%LEARNING_RATE%"=="1" set LR=1e-3
if "%LEARNING_RATE%"=="2" set LR=5e-3
if "%LEARNING_RATE%"=="" set LR=1e-3
set /p SAVE_STEPS=How usually (in steps) to avoid wasting preview photos:
set /p SAMPLE_PROMPTS=What's the location of the text-prompt file for coaching previews?
echo You entered:
echo Dataset configuration file: %DATASET_CONFIG%
echo Variety of epochs: %EPOCHS%
echo Output title: %OUTPUT_NAME%
echo Studying price: %LR%
echo Save preview photos each %SAVE_STEPS% steps.
echo Textual content-prompt file: %SAMPLE_PROMPTS%
REM Put together the command
set CMD=speed up launch --num_cpu_threads_per_process 1 --mixed_precision bf16 ^
C:Customers[Your Profile Name]DesktopMusubimusubimusubi-tunerhv_train_network.py ^
--dit C:Customers[Your Profile Name]DesktopMusubimusubimusubi-tunermodelsmp_rank_00_model_states.pt ^
--dataset_config %DATASET_CONFIG% ^
--sdpa ^
--mixed_precision bf16 ^
--fp8_base ^
--optimizer_type adamw8bit ^
--learning_rate %LR% ^
--gradient_checkpointing ^
--max_data_loader_n_workers 2 ^
--persistent_data_loader_workers ^
--network_module=networks.lora ^
--network_dim=32 ^
--timestep_sampling sigmoid ^
--discrete_flow_shift 1.0 ^
--max_train_epochs %EPOCHS% ^
--save_every_n_epochs=1 ^
--seed 42 ^
--output_dir "C:Customers[Your Profile Name]DesktopMusubiOutput Fashions" ^
--output_name %OUTPUT_NAME% ^
--vae C:/Customers/[Your Profile Name]/Desktop/Musubi/musubi/musubi-tuner/fashions/pytorch_model.pt ^
--vae_chunk_size 32 ^
--vae_spatial_tile_sample_min_size 128 ^
--text_encoder1 C:/Customers/[Your Profile Name]/Desktop/Musubi/musubi/musubi-tuner/fashions/llava_llama3_fp16.safetensors ^
--text_encoder2 C:/Customers/[Your Profile Name]/Desktop/Musubi/musubi/musubi-tuner/fashions/clip_l.safetensors ^
--sample_prompts %SAMPLE_PROMPTS% ^
--sample_every_n_steps %SAVE_STEPS% ^
--sample_at_first
echo The next command will likely be executed:
echo %CMD%
set /p CONFIRM=Do you wish to proceed with coaching (y/n)?
if /i "%CONFIRM%"=="y" (
%CMD%
) else (
echo Operation canceled.
)
REM Preserve the window open
cmd /okay
As typical, you’ll want to change all situations of [Your Profile Name] together with your appropriate Home windows profile title.
Be sure that the listing C:Customers[Your Profile Name]DesktopMusubiOutput Fashions exists, and create it at that location if not.
Coaching Previews
There’s a very primary coaching preview function just lately enabled for Musubi coach, which lets you power the coaching mannequin to pause and generate photos primarily based on prompts you will have saved. These are saved in an routinely created folder known as Pattern, in the identical listing that the skilled fashions are saved.

To allow this, you will want to avoid wasting eventually one immediate in a textual content file. The coaching BAT we created will ask you to enter the placement of this file; subsequently you possibly can title the immediate file to be something you want, and put it aside wherever.
Listed below are some immediate examples for a file that may output three totally different photos when requested by the coaching routine:

As you possibly can see within the instance above, you possibly can put flags on the finish of the immediate that may have an effect on the pictures:
–w is width (defaults to 256px if not set, in response to the docs)
–h is peak (defaults to 256px if not set)
–f is the variety of frames. If set to 1, a picture is produced; a couple of, a video.
–d is the seed. If not set, it’s random; however it’s best to set it to see one immediate evolving.
–s is the variety of steps in technology, defaulting to twenty.
See the official documentation for added flags.
Although coaching previews can shortly reveal some points which may trigger you to cancel the coaching and rethink the info or the setup, thus saving time, do keep in mind that each additional immediate slows down the coaching just a little extra.
Additionally, the larger the coaching preview picture’s width and peak (as set within the flags listed above), the extra it should sluggish coaching down.
Launch your coaching BAT file.
Query #1 is ‘Enter the trail to the dataset configuration. Paste or kind within the appropriate path to your TOML file.
Query #2 is ‘Enter the variety of epochs to coach’. It is a trial-and-error variable, because it’s affected by the quantity and high quality of photos, in addition to the captions, and different elements. On the whole, it is best to set it too excessive than too low, since you possibly can at all times cease the coaching with Ctrl+C within the coaching window if you happen to really feel the mannequin has superior sufficient. Set it to 100 within the first occasion, and see the way it goes.
Query #3 is ‘Enter the output mannequin title’. Identify your mannequin! Could also be greatest to maintain the title moderately quick and easy.
Query #4 is ‘Select studying price’, which defaults to 1e-3 (possibility 1). It is a good place to begin, pending additional expertise.
Query #5 is ‘How usually (in steps) to avoid wasting preview photos. When you set this too low, you will note little progress between preview picture saves, and this may decelerate the coaching.
Query #6 is ‘What’s the location of the text-prompt file for coaching previews?’. Paste or kind within the path to your prompts textual content file.
The BAT then reveals you the command it should ship to the Hunyuan Mannequin, and asks you if you wish to proceed, y/n.
Go forward and start coaching:
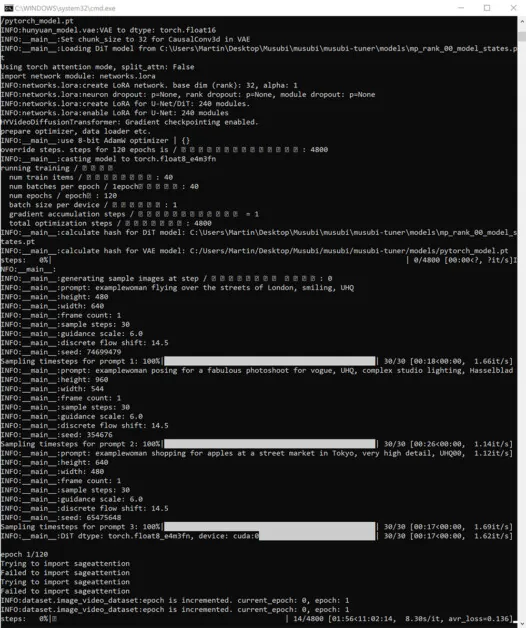
Throughout this time, if you happen to examine the GPU part of the Efficiency tab of Home windows Activity Supervisor, you may see the method is taking round 16GB of VRAM.

This will not be an arbitrary determine, as that is the quantity of VRAM out there on fairly a couple of NVIDIA graphics playing cards, and the upstream code could have been optimized to suit the duties into 16GB for the good thing about those that personal such playing cards.
That mentioned, it is vitally straightforward to boost this utilization, by sending extra exorbitant flags to the coaching command.
Throughout coaching, you may see within the lower-right aspect of the CMD window a determine for a way a lot time has handed since coaching started, and an estimate of whole coaching time (which is able to fluctuate closely relying on flags set, variety of coaching photos, variety of coaching preview photos, and several other different elements).

A typical coaching time is round 3-4 hours on median settings, relying on the out there {hardware}, variety of photos, flag settings, and different elements.
Utilizing Your Skilled LoRA Fashions in Hunyuan Video
Selecting Checkpoints
When coaching is concluded, you should have a mannequin checkpoint for every epoch of coaching.

This saving frequency could be modified by the person to avoid wasting roughly regularly, as desired, by amending the --save_every_n_epochs [N] quantity within the coaching BAT file. When you added a low determine for saves-per-steps when establishing coaching with the BAT, there will likely be a excessive variety of saved checkpoint information.
Which Checkpoint to Select?
As talked about earlier, the earliest-trained fashions will likely be most versatile, whereas the later checkpoints could provide probably the most element. The one technique to take a look at for these elements is to run a few of the LoRAs and generate a couple of movies. On this manner you may get to know which checkpoints are best, and signify one of the best stability between flexibility and constancy.
ComfyUI
The preferred (although not the one) surroundings for utilizing Hunyuan Video LoRAs, in the mean time, is ComfyUI, a node-based editor with an elaborate Gradio interface that runs in your net browser.

Supply: https://github.com/comfyanonymous/ComfyUI
Set up directions are simple and out there on the official GitHub repository (further fashions must be downloaded).
Changing Fashions for ComfyUI
Your skilled fashions are saved in a (diffusers) format that isn’t appropriate with most implementations of ComfyUI. Musubi is ready to convert a mannequin to a ComfyUI-compatible format. Let’s arrange a BAT file to implement this.
Earlier than operating this BAT, create the C:Customers[Your Profile Name]DesktopMusubiCONVERTED folder that the script is anticipating.
@echo off
REM Activate the digital surroundings
name C:Customers[Your Profile Name]DesktopMusubimusubiScriptsactivate.bat
:START
REM Get person enter
set /p INPUT_PATH=Enter the trail to the enter Musubi safetensors file (or kind "exit" to give up):
REM Exit if the person varieties "exit"
if /i "%INPUT_PATH%"=="exit" goto END
REM Extract the file title from the enter path and append 'transformed' to it
for %%F in ("%INPUT_PATH%") do set FILENAME=%%~nF
set OUTPUT_PATH=C:Customers[Your Profile Name]DesktopMusubiOutput ModelsCONVERTEDpercentFILENAMEpercent_converted.safetensors
set TARGET=different
echo You entered:
echo Enter file: %INPUT_PATH%
echo Output file: %OUTPUT_PATH%
echo Goal format: %TARGET%
set /p CONFIRM=Do you wish to proceed with the conversion (y/n)?
if /i "%CONFIRM%"=="y" (
REM Run the conversion script with appropriately quoted paths
python C:Customers[Your Profile Name]DesktopMusubimusubimusubi-tunerconvert_lora.py --input "%INPUT_PATH%" --output "%OUTPUT_PATH%" --target %TARGET%
echo Conversion full.
) else (
echo Operation canceled.
)
REM Return to begin for an additional file
goto START
:END
REM Preserve the window open
echo Exiting the script.
pause
As with the earlier BAT information, save the script as ‘All information’ from Notepad, naming it convert.bat (or no matter you want).
As soon as saved, double-click the brand new BAT file, which is able to ask for the placement of a file to transform.

Paste in or kind the trail to the skilled file you wish to convert, click on y, and press enter.
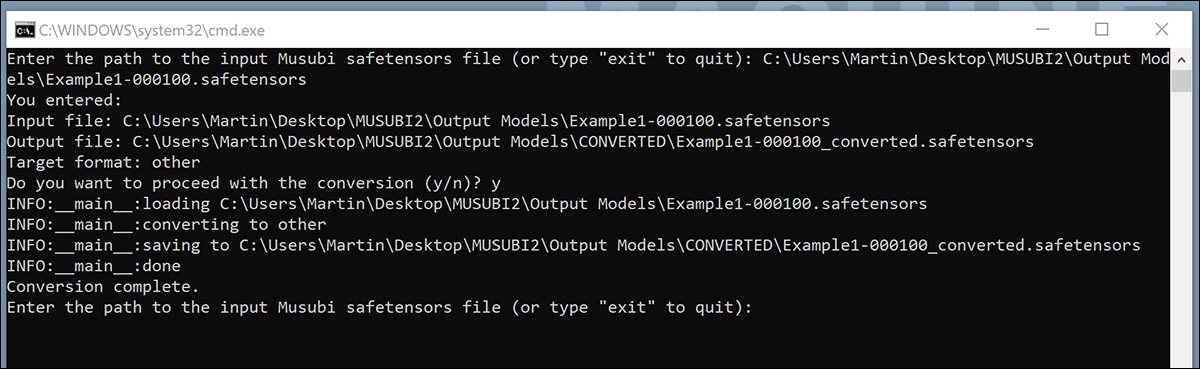
After saving the transformed LoRA to the CONVERTED folder, the script will ask if you need to transform one other file. If you wish to take a look at a number of checkpoints in ComfyUI, convert a number of the fashions.
When you will have transformed sufficient checkpoints, shut the BAT command window.
Now you can copy your transformed fashions into the modelsloras folder in your ComfyUI set up.
Sometimes the right location is one thing like:
C:Customers[Your Profile Name]DesktopComfyUImodelsloras
Creating Hunyuan Video LoRAs in ComfyUI
Although the node-based workflows of ComfyUI appear complicated initially, the settings of different extra skilled customers could be loaded by dragging a picture (made with the opposite person’s ComfyUI) instantly into the ComfyUI window. Workflows will also be exported as JSON information, which could be imported manually, or dragged right into a ComfyUI window.
Some imported workflows may have dependencies that won’t exist in your set up. Due to this fact set up ComfyUI-Supervisor, which might fetch lacking modules routinely.

Supply: https://github.com/ltdrdata/ComfyUI-Supervisor
To load one of many workflows used to generate movies from the fashions on this tutorial, obtain this JSON file and drag it into your ComfyUI window (although there are much better workflow examples out there on the varied Reddit and Discord communities which have adopted Hunyuan Video, and my very own is customized from one in every of these).
This isn’t the place for an prolonged tutorial in using ComfyUI, however it’s value mentioning a couple of of the essential parameters that may have an effect on your output if you happen to obtain and use the JSON format that I linked to above.

1) Width and Top
The bigger your picture, the longer the technology will take, and the upper the danger of an out-of-memory (OOM) error.
2) Size
That is the numerical worth for the variety of frames. What number of seconds it provides as much as rely upon the body price (set to 30fps on this format). You’ll be able to convert seconds>frames primarily based on fps at Omnicalculator.
3) Batch dimension
The upper you set the batch dimension, the faster the outcome could come, however the larger the burden of VRAM. Set this too excessive and you might get an OOM.
4) Management After Generate
This controls the random seed. The choices for this sub-node are mounted, increment, decrement and randomize. When you depart it at mounted and don’t change the textual content immediate, you’ll get the identical picture each time. When you amend the textual content immediate, the picture will change to a restricted extent. The increment and decrement settings permit you to discover close by seed values, whereas randomize offers you a very new interpretation of the immediate.
5) Lora Identify
You’ll need to pick your individual put in mannequin right here, earlier than trying to generate.
6) Token
When you have skilled your mannequin to set off the idea with a token, (corresponding to ‘example-person’), put that set off phrase in your immediate.
7) Steps
This represents what number of steps the system will apply to the diffusion course of. Greater steps could get hold of higher element, however there’s a ceiling on how efficient this strategy is, and that threshold could be exhausting to search out. The frequent vary of steps is round 20-30.
8) Tile Dimension
This defines how a lot data is dealt with at one time throughout technology. It is set to 256 by default. Elevating it might velocity up technology, however elevating it too excessive can result in a very irritating OOM expertise, because it comes on the very finish of a protracted course of.
9) Temporal Overlap
Hunyuan Video technology of individuals can result in ‘ghosting’, or unconvincing motion if that is set too low. On the whole, the present knowledge is that this must be set to the next worth than the variety of frames, to supply higher motion.
Conclusion
Although additional exploration of ComfyUI utilization is past the scope of this text, group expertise at Reddit and Discords can ease the training curve, and there are a number of on-line guides that introduce the fundamentals.
First revealed Thursday, January 23, 2025