Home Blog Page 8

Decoding the Ubiquitin Code: How the RQT Complicated Clears Colliding… – Weblog • by NanoWorld®


Matsuo et al., just lately printed a landmark research in Nature Communications (vol. 14, article 79, Jan 10 2023). , how cells acknowledge and resolve ribosome collisions—a important occasion in obeying translational constancy and avoiding protein high quality management failure.

The researchers employed a mixture of molecular genetics, biochemical assays, ubiquitin-binding research, and superior imaging. Key steps included mutational deletion of ubiquitin‐binding domains in RQT subunits, affinity assays for K63-linked ubiquitin chains, and highspeed atomic pressure microscopy (HSAFM) to visualise complicated conduct on the molecular stage. Notably, they used intrinsically disordered areas of Rqt4 mapped by realtime HSAFM.

The research reveals that Cue3 and Rqt4 of the RQT complicated work together with the K63-linked ubiquitin chain and facilitate the recruitment of the RQT (ribosome-associated high quality management set off) complicated to ubiquitinated colliding ribosomes. Deletion of both area abolished RQT’s means to dissociate colliding ribosomes. Crucially, HSAFM revealed that Rqt4’s versatile disordered segments increase the interplay radius, enabling efficient engagement with the ubiquitin chain. This expanded search functionality enhances well timed RQT recruitment and ribosome splitting earlier than rogue collisions construct up.
These findings elucidate a molecular “decoding” mechanism—how RQT interprets the ubiquitin code (particularly K63 ubiquitination) and transforms it into mechanical motion, splitting ribosomal subunits to facilitate high quality management. This work offers a mechanistic hyperlink between ubiquitin signaling and translational rescue pathways within the cell NanoWorld’s USC-F1.2-k0.15, designed for resonance frequencies of 1.2 MHz and tip radii under 10 nm, had been used within the high-speed AFM research that had been essential to this investigation.

Fig. 3: The dynamics of the RQT complex
licensed underneath a Inventive Commons Attribution 4.0 Worldwide License
Matsuo, Y., Uchihashi, T. & Inada, T. Decoding of the ubiquitin code for clearance of colliding ribosomes by the RQT complicated. Nat Commun 14, 79 (2023). https://doi.org/10.1038/s41467-022-35608-4
Decoding the Ubiquitin Code: How the RQT Complicated Clears Colliding Ribosomes

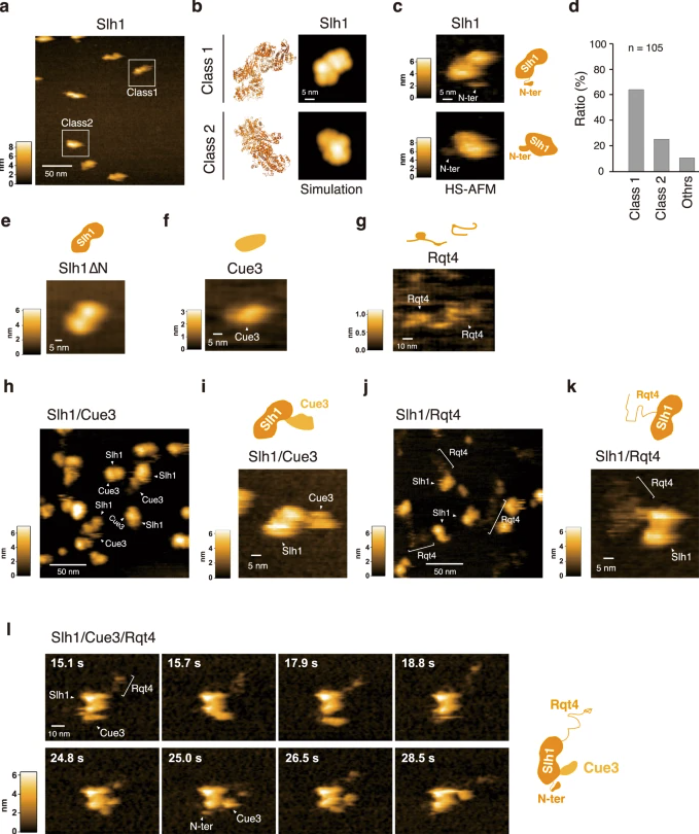
a HS-AFM picture of Slh1. Two main particles had been indicated as Class1 and Class2. b The pseudo-AFM photographs of Slh1 belonging to Class1 and Class2 particles, which had been simulated utilizing predicted Slh1 construction missing N-terminal area by Alphafold2. c The HS-AFM photographs and schematized molecular options of Slh1. d Classification of Slh1 particles. All particles used for the classification had been offered within the supplementary Fig. 4. e HS-AFM photographs of Slh1 missing N-terminal area (Slh1∆N). f HS-AFM picture of Cue3. g HS-AFM picture of Rqt4. h, i HS-AFM photographs of Slh1/Cue3 complicated. j, okay HS-AFM photographs of Slh1/Rqt4 complicated. l The time-lapse HS-AFM photographs of the RQT complicated. All experiments had been carried out a minimum of twice with extremely reproducible outcomes.

This text fantastically merges state-of-the-art structural biology with nanotechnology instruments to disclose how molecular collisions are detected and resolved. The incorporation of ultra-fast AFM probe expertise makes it doable to watch RQT in motion, delivering new perception into mobile high quality management.

Enterprise suggestions for cloud success


The remaining suggestions had been cited by roughly two-thirds of the enterprises. Tip quantity three is to look particularly at functions whose customers are extensively dispersed. And by “extensively” right here, they imply on totally different continents, not simply totally different neighborhoods. The reason being that high quality of expertise and even availability may be compromised when work has to transit numerous networks simply to get to the place it’s processed. This could result in consumer dissatisfaction, and dispersing assets nearer to the customers will be the solely answer. If an enterprise doesn’t have already got their very own information heart situated shut to every consumer focus, chances are high that placing a brand new internet hosting level in themselves couldn’t obtain affordable financial system of scale in capex, energy and cooling, and operations prices. The cloud can be cheaper.

A qualifying remark right here is to take nice care in evaluating the true influence of dispersion of utility customers. In some circumstances, there might not be sufficient of a distinction in QoE or availability to require dispersing internet hosting factors, and in reality it could be that the place the appliance is hosted isn’t even the issue. “The cloud might appear to be the simple manner out,” one enterprise stated, “however it might not be the economical manner.” See the place your QoE points actually lie earlier than you go to the cloud’s distributed internet hosting to repair them.

Tip 4 is to look at the user-to-application interplay mannequin rigorously, to see if there’s a big non-transactional part. Mission-critical enterprise techniques, and enterprise core databases, are virtually all the time within the information heart. The stuff that adjustments them are the transactions that add, replace, and delete data. If an utility’s consumer interplay is tightly coupled to the creation of transactions, then its processing is tied to these information heart assets. That makes it tougher to maneuver the user-interface piece to the cloud and achieve any economies. However, if there’s numerous consumer back-and-forth that doesn’t contain entry to these core assets, then there’s a very good probability that the interplay piece may be hosted within the cloud at affordable value.

A tip to determine whether or not this level applies is to take a look at what information is definitely supplied to the consumer through the pre-transaction piece of the interplay. If a lot of the information has to return from the core database, then pushing it into the cloud for assessment can create skyrocketing and extremely variable information switch prices. If a abstract product or different database may be hosted within the cloud, then that value may be predicted and managed.

Select functions properly

The ultimate tip, I feel, is probably the obvious but in addition maybe crucial. It’s greatest to give attention to functions that want altering for another cause. Some enterprises say to give attention to functions already scheduled for change, some say that it’s broader than that. How a lot cash are you able to save by redoing an utility? It relies on how sure you’re of each present prices and anticipated prices, and the way dangerous the disruption is. Most often, it’s doable to get an correct present value for an utility, however future prices? You need to count on to undertaking orderly progress into current-cost estimates and do the identical for the cloud prices. However no matter the fee comparability, enterprises level out that there’s all the time a danger in making any change to an essential utility, and shifting it into (or out of) the cloud is unquestionably a major change.

The take from these super-succeeders, cloud-wise, is that the cloud is efficacious as a result of it’s very totally different from the info heart, and harmful for a similar cause. You’ll be able to’t assume that what works in a single will work as properly within the different, or work in any respect. It’s greatest to get issues proper from the beginning, however the group agrees that pilot testing to validate the monetary assumptions can nonetheless prevent, and your funds, by supplying you with an early out. Every part isn’t shifting to the cloud, they are saying, as a result of the cloud isn’t greatest for all the pieces. Write that in your whiteboard earlier than each cloud assembly you schedule, and add that possibly it’s time to get your head into the clouds somewhat than out of them.

the best way to present ios like DatePicker in flutter just like the one proven in journal app of apple


You possibly can wrap TableCalendar inside a showCupertinoModalPopup

Future showCupertinoCalendarPicker(BuildContext context) {
  DateTime selectedDate = DateTime.now();
  DateTime focusedDate = DateTime.now();

  return showCupertinoModalPopup(
    context: context,
    builder: (ctx) {
      return Container(
        peak: 500,
        ornament: const BoxDecoration(
          shade: Colour.fromARGB(255, 18, 18, 18),
          borderRadius: BorderRadius.vertical(high: Radius.round(20)),
        ),
        baby: Column(
          kids: [
            Row(
              children: [
                CupertinoButton(
                  onPressed: () => Navigator.of(ctx).pop(),
                  child: const Text(
                    'Cancel',
                    style: TextStyle(color: CupertinoColors.activeBlue),
                  ),
                ),
                const Spacer(),
                const Text(
                  'Edit Date',
                  style: TextStyle(
                    color: CupertinoColors.white,
                    fontWeight: FontWeight.bold,
                  ),
                ),
                const Spacer(),
                CupertinoButton(
                  onPressed: () => Navigator.of(ctx).pop(selectedDate),
                  child: const Text(
                    'Done',
                    style: TextStyle(color: CupertinoColors.activeBlue),
                  ),
                ),
              ],
            ),
            const SizedBox(peak: 8),
            const Textual content(
              'SELECT CUSTOM DATE',
              type: TextStyle(
                shade: CupertinoColors.systemGrey,
                fontSize: 13,
              ),
            ),
            Expanded(
              baby: SingleChildScrollView(
                baby: TableCalendar(
                  firstDay: DateTime.utc(2000, 1, 1),
                  lastDay: DateTime.utc(2100, 12, 31),
                  focusedDay: focusedDate,
                  selectedDayPredicate: (day) =>
                      day.12 months == selectedDate.12 months &&
                      day.month == selectedDate.month &&
                      day.day == selectedDate.day,
                  onDaySelected: (chosen, centered) {
                    selectedDate = chosen;
                    focusedDate = centered;
                  },
                  calendarFormat: CalendarFormat.month,
                  headerStyle: const HeaderStyle(
                    formatButtonVisible: false,
                    titleCentered: true,
                    leftChevronIcon: Icon(
                      CupertinoIcons.left_chevron,
                      shade: CupertinoColors.activeBlue,
                      dimension: 18,
                    ),
                    rightChevronIcon: Icon(
                      CupertinoIcons.right_chevron,
                      shade: CupertinoColors.activeBlue,
                      dimension: 18,
                    ),
                    titleTextStyle: TextStyle(
                      shade: CupertinoColors.white,
                      fontWeight: FontWeight.w600,
                    ),
                  ),
                  daysOfWeekStyle: const DaysOfWeekStyle(
                    weekdayStyle: TextStyle(
                      shade: CupertinoColors.systemGrey2,
                    ),
                    weekendStyle: TextStyle(
                      shade: CupertinoColors.systemGrey2,
                    ),
                  ),
                  calendarStyle: const CalendarStyle(
                    outsideDaysVisible: false,
                    todayDecoration: BoxDecoration(
                      shade: CupertinoColors.systemGrey,
                      form: BoxShape.circle,
                    ),
                    selectedDecoration: BoxDecoration(
                      shade: CupertinoColors.activeBlue,
                      form: BoxShape.circle,
                    ),
                    defaultTextStyle: TextStyle(
                      shade: CupertinoColors.white,
                    ),
                    weekendTextStyle: TextStyle(
                      shade: CupertinoColors.white,
                    ),
                    disabledTextStyle: TextStyle(
                      shade: CupertinoColors.systemGrey4,
                    ),
                  ),
                ),
              ),
            ),
          ],
        ),
      );
    },
  );
}

Result

ios – UICollectionView freezes after double-tap on a rotated/scaled cell throughout horizontal scrolling


I’ve a horizontally scrolling UICollectionView in Swift.
Inside scrollViewDidScroll, I apply a rotation and scale rework to seen cells to create a card-tilt impact.

The difficulty:
If I double-tap or use two fingers on the gathering view throughout scrolling, the gathering view turns into “frozen” — it stops responding to swipe gestures, and the centered cell stays caught in place till I reload knowledge.

It looks as if making use of a rework in scrollViewDidScroll interferes with the gathering view’s contact dealing with and hit-testing, however I can’t work out easy methods to forestall it with out eradicating the rework impact.

How can I preserve the rework impact and stop the gathering view from freezing after multi-touch or double-tap?

func scrollViewDidScroll(_ scrollView: UIScrollView) {
        guard let collectionView = scrollView as? UICollectionView else { return }
        
        for cell in collectionView.visibleCells {
            // 1. Calculate the cell's horizontal distance from the middle of the display
            let centerX = view.bounds.width / 2
            let cellCenter = collectionView.convert(cell.middle, to: view)
            let distance = centerX - cellCenter.x
            
            // 2. Calculate rotation and scale based mostly on this distance
            // The farther from the middle, the extra it rotates and shrinks.
            let maxDistance = collectionView.bounds.width / 2
            let normalizedDistance = distance / maxDistance // Worth from -1 to 1
            
            let maxAngle = CGFloat.pi / 30 // A refined angle (e.g., 6 levels)
            let angle = maxAngle * normalizedDistance
            
            let minScale: CGFloat = 0.9
            let scale = 1.0 - (abs(normalizedDistance) * (1.0 - minScale))
            
            // 3. Apply the rework
            UIView.animate(withDuration: 0.3, delay: 0, choices: [.beginFromCurrentState, .allowUserInteraction], animations: {
                cell.rework = CGAffineTransform(rotationAngle: angle).scaledBy(x: scale, y: scale)
            }, completion: nil)
            
        }
        // ✅ Set preliminary centered index as soon as after format go
        if !hasSetInitialCenteredIndex {
            hasSetInitialCenteredIndex = true
            DispatchQueue.predominant.asyncAfter(deadline: .now() + 0.05) {
                self.snapToNearestCell()
                self.applyTransformToVisibleCells()
            }
        }
    }
    
    func scrollViewWillBeginDragging(_ scrollView: UIScrollView) {
        
        self.cardsCollectionView.isUserInteractionEnabled = false
        
        isScrolling = true
        
        let velocity = scrollView.panGestureRecognizer.velocity(in: scrollView)
        currentScrollDirection = velocity.x == 0 ? 0 : (velocity.x > 0 ? 1 : -1)
        
    }
    
    func scrollViewDidEndDecelerating(_ scrollView: UIScrollView) {
        
        self.cardsCollectionView.isUserInteractionEnabled = true
        
        isScrolling = false
        
        let pageWidth = scrollView.body.measurement.width
        let currentPage = Int((scrollView.contentOffset.x + pageWidth / 2) / pageWidth)
        
        if currentPage == 0 {
            let indexPath = IndexPath(merchandise: infinitePlaceholderArray.rely - 2, part: 0)
            cardsCollectionView.scrollToItem(at: indexPath, at: .centeredHorizontally, animated: false)
            
            // Delay snapping till format is corrected
            DispatchQueue.predominant.asyncAfter(deadline: .now() + 0.01) {
                self.snapToNearestCell()
                UIView.animate(withDuration: 0.3) {
                    self.applyTransformToVisibleCells()
                }
            }
            return
            
        } else if currentPage == infinitePlaceholderArray.rely - 1 {
            let indexPath = IndexPath(merchandise: 1, part: 0)
            cardsCollectionView.scrollToItem(at: indexPath, at: .centeredHorizontally, animated: false)
            
            // Delay snapping
            DispatchQueue.predominant.asyncAfter(deadline: .now() + 0.01) {
                self.snapToNearestCell()
                UIView.animate(withDuration: 0.3) {
                    self.applyTransformToVisibleCells()
                }
            }
            return
        }
        
        // No wrapping, snap usually
        snapToNearestCell()
        UIView.animate(withDuration: 0.3) {
            self.applyTransformToVisibleCells()
        }
    }
    
    func scrollViewDidEndDragging(_ scrollView: UIScrollView, willDecelerate decelerate: Bool) {
        if !decelerate {
            
            self.cardsCollectionView.isUserInteractionEnabled = true
            
            isScrolling = false
            
            snapToNearestCell()
            UIView.animate(withDuration: 0.3) {
                self.applyTransformToVisibleCells()
            }
        }
    }
    
    func setupInfiniteDataSource() {
        // Ensure you have knowledge to work with
        guard !placeholderArray.isEmpty else { return }
        
        // [Last Item] + [All Original Items] + [First Item]
        infinitePlaceholderArray.append(placeholderArray.final!)
        infinitePlaceholderArray.append(contentsOf: placeholderArray)
        infinitePlaceholderArray.append(placeholderArray.first!)
    }
    
    func applyTransformToVisibleCells() {
        guard let collectionView = cardsCollectionView else { return }
        
        for cell in collectionView.visibleCells {
            let centerX = view.bounds.width / 2
            let cellCenter = collectionView.convert(cell.middle, to: view)
            let distance = centerX - cellCenter.x
            
            let maxDistance = collectionView.bounds.width / 2
            let normalizedDistance = distance / maxDistance
            
            let maxAngle = CGFloat.pi / 30
            let angle = maxAngle * normalizedDistance
            
            let minScale: CGFloat = 0.9
            let scale = 1.0 - (abs(normalizedDistance) * (1.0 - minScale))
            
            cell.rework = CGAffineTransform(rotationAngle: angle).scaledBy(x: scale, y: scale)
        }
    }

    non-public func snapToNearestCell() {
        guard let collectionView = cardsCollectionView else { return }
        
        let centerX = collectionView.bounds.measurement.width / 2 + collectionView.contentOffset.x
        
        var closestIndexPath: IndexPath?
        var closestDistance: CGFloat = .greatestFiniteMagnitude
        
        for cell in collectionView.visibleCells {
            let cellCenterX = cell.middle.x
            let distance = abs(cellCenterX - centerX)
            if distance < closestDistance {
                closestDistance = distance
                closestIndexPath = collectionView.indexPath(for: cell)
            }
        }
        
        if let indexPath = closestIndexPath {
            currentlyCenteredIndexPath = indexPath  // Observe centered cell
            collectionView.scrollToItem(at: indexPath, at: .centeredHorizontally, animated: true)
        }
        
    }
    
    non-public func handleInfiniteScrollWrapping(for scrollView: UIScrollView) {
        let pageWidth = scrollView.body.measurement.width
        let currentPage = Int(flooring((scrollView.contentOffset.x - pageWidth / 2) / pageWidth) + 1)
        
        if currentPage == 0 {
            let targetIndexPath = IndexPath(merchandise: infinitePlaceholderArray.rely - 2, part: 0)
            cardsCollectionView.scrollToItem(at: targetIndexPath, at: .centeredHorizontally, animated: false)
        } else if currentPage == infinitePlaceholderArray.rely - 1 {
            let targetIndexPath = IndexPath(merchandise: 1, part: 0)
            cardsCollectionView.scrollToItem(at: targetIndexPath, at: .centeredHorizontally, animated: false)
        }
    }
}

I attempted:

  • Detecting a number of touches in touchesBegan and calling my snapToNearestCell() technique to pressure snapping.

  • Quickly disabling isUserInteractionEnabled on the gathering view throughout snap animations.

  • Forcing scrollViewWillEndDragging and scrollViewDidEndDecelerating logic to run manually after multi-touch.

Anticipated:
The gathering view ought to snap to the closest cell after a multi-touch occasion and stay scrollable as regular.

Precise end result:
After a double-tap or two-finger contact whereas scrolling, the gathering view turns into caught. Scrolling stops working fully, and I’ve to reload the gathering view to revive interplay.

ios – Learn how to ship a communication notification regionally, with out Push server?


I am struggling to ship a communication notification (with the sender’s avatar and his identify). I am making a shopper software for a third-party web site the place sending Push notifications shouldn’t be applied. In consequence, I exploit native notification sending. I discovered little or no info on the Web about these notifications, however the code I discovered would not work for me.

The query is, can communication notifications be despatched solely by Push notifications? If that’s the case, this subject might be thought of closed. If not, why do I’ve an everyday notification despatched, though I turned on the required Capabilities and added Message Intent to Data.plist.

To make clear, I haven’t got a backend server. I am simply asking if notifications with an avatar and speak to identify (communication notifications) work just for Push notifications? I am unable to ship a push, solely a neighborhood notification. BUT I am unable to fashion the native notification below the message fashion with the contact identify and avatar.

func didReceive(
    request: UNNotificationRequest,
    withContentHandler contentHandler: @escaping (UNNotificationContent
    ) -> Void) {
    let deal with = INPersonHandle(worth: "unique-user-id)", sort: .unknown)
    let sender = INPerson(personHandle: deal with,
                                  nameComponents: nil,
                                  displayName: "Title",
                                  picture: nil, // right here you'll be able to present UIImage for consumer avatar
                                  contactIdentifier: nil,
                                  customIdentifier: "unique-user-id")
    
    let intent = INSendMessageIntent(
        recipients: nil,
        outgoingMessageType: .outgoingMessageText,
        content material: "content material of message",
        speakableGroupName: nil,
        conversationIdentifier: "unique-user-id-conv",
        serviceName: nil,
        sender: sender,
        attachments: nil
    )
    
    let interplay = INInteraction(intent: intent, response: nil)
    
    interplay.path = .incoming
    
    interplay.donate(completion: nil)
    
    let content material = request.content material
    
    do {
        let updatedContent = strive content material.updating(from: intent)
        let mutableBestAttemptContent = (updatedContent.mutableCopy() as? UNMutableNotificationContent)!
        mutableBestAttemptContent.threadIdentifier = "Thread-identifier" // use this subject for grouping notifications
        mutableBestAttemptContent.userInfo = request.content material.userInfo
        
        contentHandler(mutableBestAttemptContent)
        
    } catch {
        // Deal with errors that will happen whereas updating content material.
    }
}