The Royal Air Pressure has used a mix of sustainable aviation gas (SAF) with regular jet gas on routine operations for the primary time.
Plane together with Storm and Poseidon submarine hunters, working from RAF Lossiemouth in Scotland, have been utilizing a mix of typical and SAF in an obvious first for the air power.
Throughout November 2023 to February 2024 4 million litres of blended SAF had been delivered to the Royal Air Pressure by means of a contract with World Gas Providers. An extra 5 million 100 and fifty thousand litres of gas are being delivered over the interval July to October 2024.
The gas is used to energy plane working from Lossiemouth in Morayshire, northern Scotland. RAF Lossiemouth is among the UK’s busiest RAF stations and is dwelling to Storm plane who’re able to deploy 24/7, 365 as a part of the UK’s Fast Response Alert – preserving Britain safe.
Sustainable gas sources embody hydrogenated fat and oils, wooden waste, alcohols, sugars, family waste, biomass and algae.
Aviation presently accounts for almost two thirds of gas used throughout defence.
In 2020, the MoD up to date aviation gas requirements to permit as much as 50% sustainable sources for use in gas mixes for defence plane. The RAF has been trialling several types of gas since then. In November 2021, an RAF pilot flew a microlight plane powered by artificial gas created from air and water, described as a world-first. In Spring 2022, a drone was flown on artificial kerosene made by genetically modified micro organism. The RAF has additionally examined an electrical plane flown at RAF Cranwell.
In November 2022, an RAF Voyager trialled the usage of 100% SAF, flying for 90-minutes from RAF Brize Norton, mentioned to be a world first for a wide-bodied navy plane, a joint endeavour between the RAF, DE&S and business companions Airbus, AirTanker and Rolls-Royce, with the gas provided by Air bp.
In 2023, the Royal Air Pressure used SAF to attain the primary SAF mix air-to-air refuelling of a Storm and C-130 Hercules plane. This was adopted by the RAF’s show hurricane being powered on blended SAF at this 12 months’s Royal Worldwide Air Tattoo, the primary time this plane has exhibited to the general public on this gas.
In any person interface, focus performs a vital function in figuring out which factor receives the following enter. SwiftUI gives a robust set of instruments and consider modifiers that let you management and handle focus in your apps. By utilizing these modifiers, you possibly can point out which views are eligible to obtain focus, detect which view at present has focus, and even programmatically management the main focus state.
On this tutorial, we are going to discover the ins and outs of SwiftUI’s focus administration API, empowering you to create partaking and interactive person experiences. Particularly, we are going to dive deep into the utilization of key property wrappers like @FocusState, @FocusedValue, and @FocusObject.
Working with @FocusState
Let’s first begin with @FocusState. With this wrapper, builders can simply handle the main focus of particular views and monitor whether or not a view is at present in focus. To look at and replace the main focus state of a view, we generally use the centered modifier along with the @FocusState property wrapper. By leveraging these APIs, you’ll acquire exact management over the main focus habits of SwiftUI views.
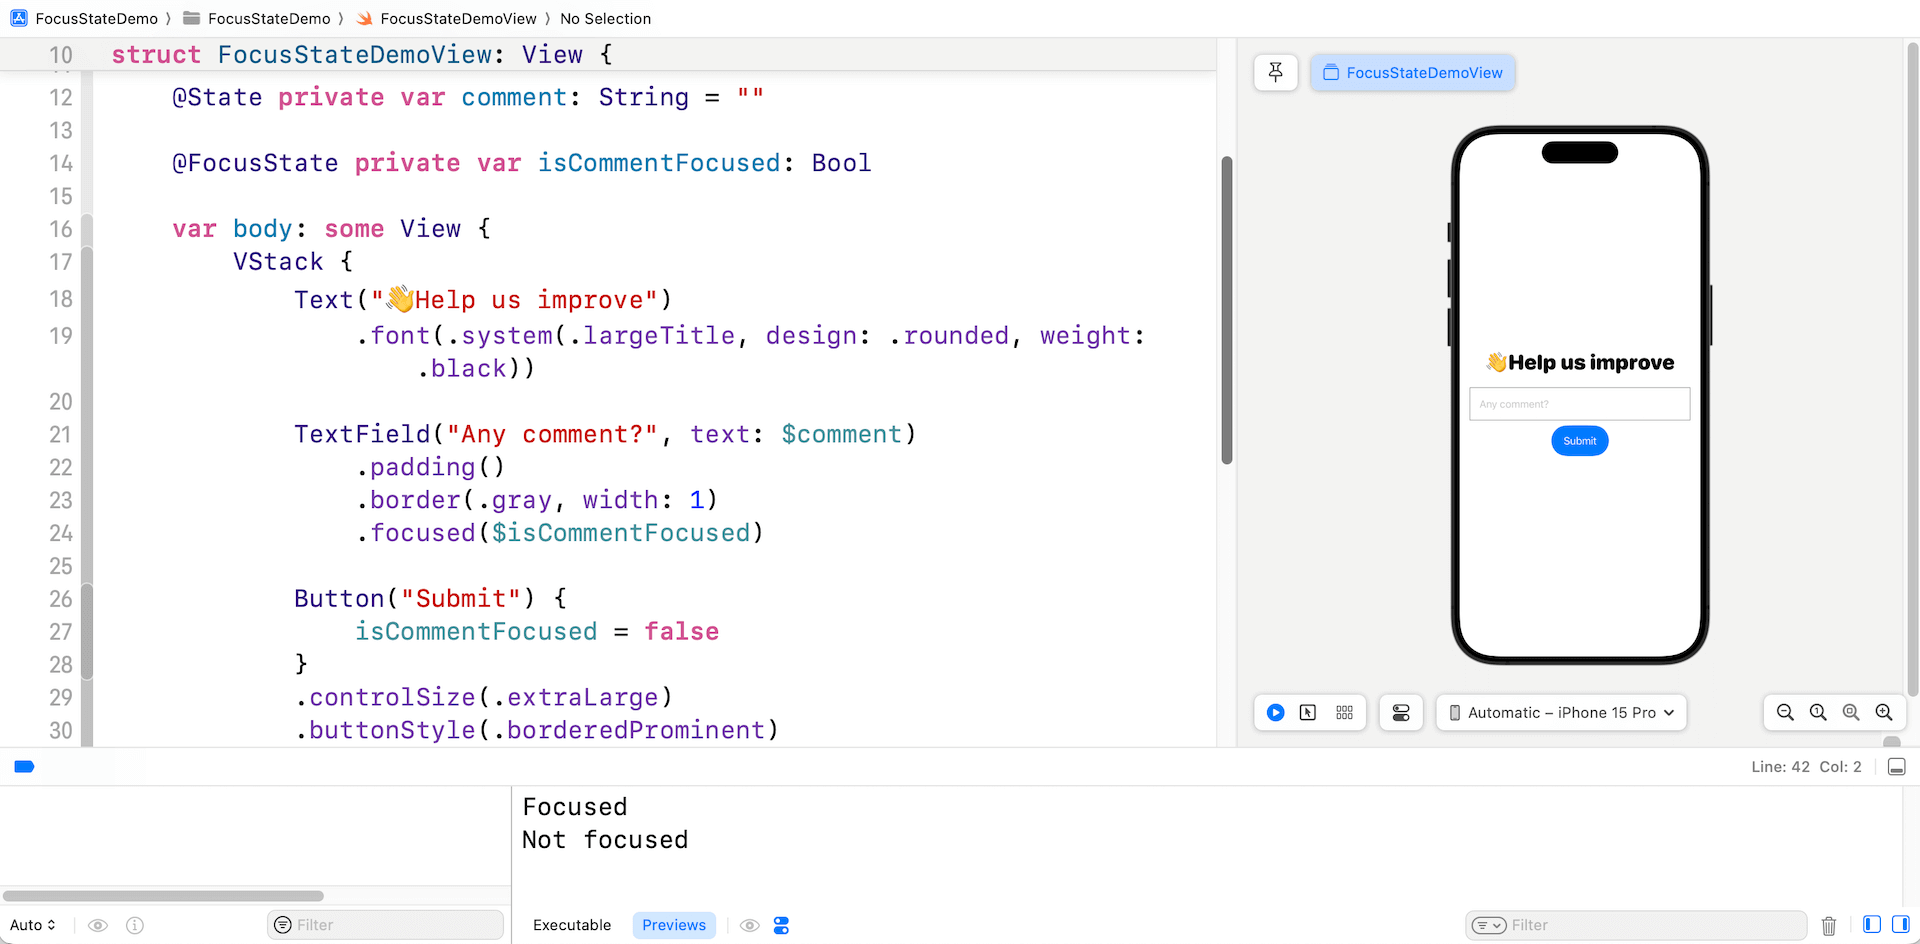
To offer you a clearer understanding of how centered and @FocusState work collectively, let’s stroll via an instance.
struct FocusStateDemoView: View {

    @State personal var remark: String = ""

    @FocusState personal var isCommentFocused: Bool

    var physique: some View {
        VStack {
            Textual content("👋Assist us enhance")
                .font(.system(.largeTitle, design: .rounded, weight: .black))

            TextField("Any remark?", textual content: $remark)
                .padding()
                .border(.grey, width: 1)
                .centered($isCommentFocused)

            Button("Submit") {
                isCommentFocused = false
            }
            .controlSize(.extraLarge)
            .buttonStyle(.borderedProminent)

        }
        .padding()
        .onChange(of: isCommentFocused) { oldValue, newValue in
            print(newValue ? "Centered" : "Not centered")
        }
    }
}
Within the code above, we create a easy kind with a “remark” textual content subject. We’ve a property named isCommentFocused, which is annotated with @FocusState to maintain monitor of the main focus state of the textual content subject. For the “remark” subject, we connect the centered modifier and bind the isCommentFocused property.
By doing so, SwiftUI robotically displays the main focus state of the “remark” subject. When the sphere is in focus, the worth of isCommentFocused might be set to true. Conversely, when the sphere loses focus, the worth might be up to date to false. You can too programmatically management the main focus of the textual content subject by updating its worth. As an illustration, we reset the main focus by setting isCommentFocused to false when the Submit button is tapped.
The onChange modifier is used to disclose the change of the main focus state. It displays the isCommentFocused variable and print out its worth.
If you check the app demo within the preview pane, the console ought to show the message “Centered” when the “remark” subject is in focus. Moreover, tapping the Submit button ought to set off the message “Not centered” to look.
Utilizing Enum to Handle Focus States
Utilizing a boolean variable works successfully if you solely want to trace the main focus state of a single textual content subject. Nonetheless, it will probably develop into cumbersome when it’s important to deal with the main focus state of a number of textual content fields concurrently.
Fairly than boolean variables, you possibly can outline an enum kind which conforms to Hashable to handle the main focus states of a number of textual content fields (or SwiftUI views).
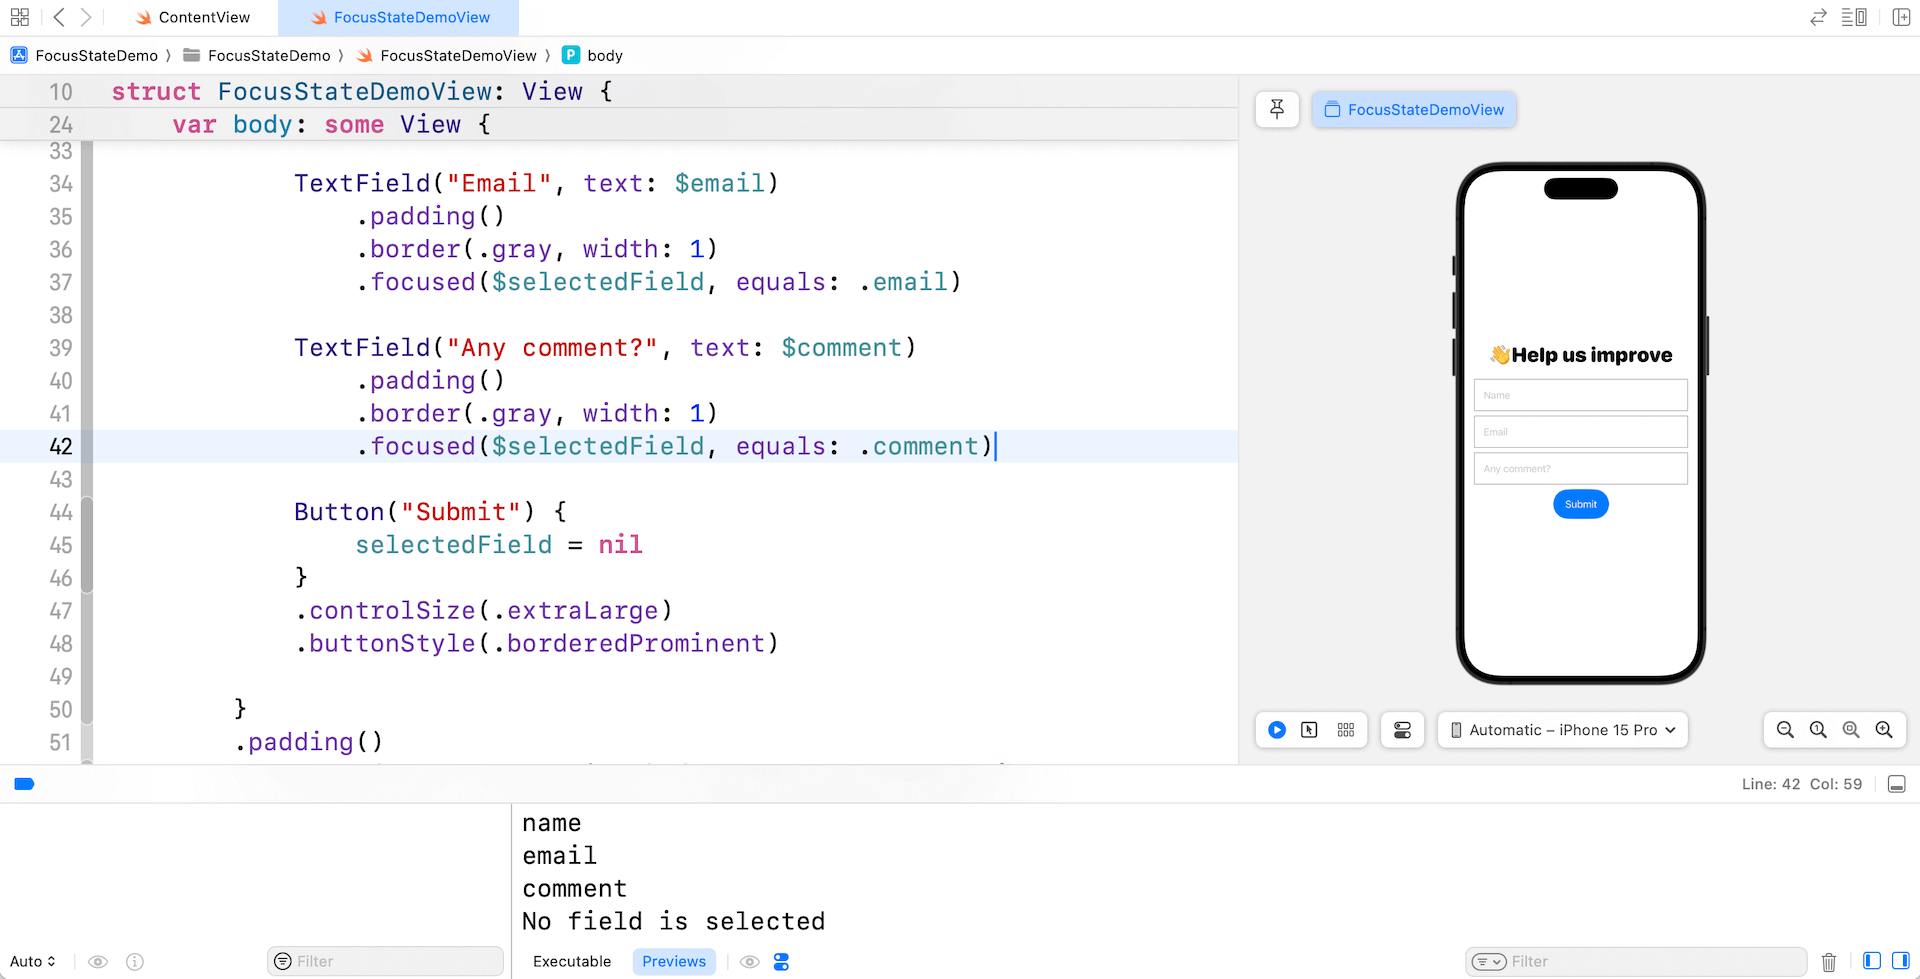
Let’s proceed for instance this system with the identical app demo. We are going to add two extra textual content fields together with title and e mail to the shape view. Right here is the modified program:
struct FocusStateDemoView: View {

    enum Discipline: Hashable {
        case title
        case e mail
        case remark
    }

    @State personal var title: String = ""
    @State personal var e mail: String = ""
    @State personal var remark: String = ""

    @FocusState personal var selectedField: Discipline?

    var physique: some View {
        VStack {
            Textual content("👋Assist us enhance")
                .font(.system(.largeTitle, design: .rounded, weight: .black))

            TextField("Title", textual content: $title)
                .padding()
                .border(.grey, width: 1)
                .centered($selectedField, equals: .title)

            TextField("Electronic mail", textual content: $e mail)
                .padding()
                .border(.grey, width: 1)
                .centered($selectedField, equals: .e mail)

            TextField("Any remark?", textual content: $remark)
                .padding()
                .border(.grey, width: 1)
                .centered($selectedField, equals: .remark)

            Button("Submit") {
                selectedField = nil
            }
            .controlSize(.extraLarge)
            .buttonStyle(.borderedProminent)

        }
        .padding()
        .onChange(of: selectedField) { oldValue, newValue in
            print(newValue ?? "No subject is chosen")
        }
    }
}
To effectively handle the main focus of a number of textual content fields, we keep away from defining extra boolean variables and as an alternative introduce an enum kind referred to as Discipline. This enum conforms to the Hashable protocol and defines three circumstances, every representing one of many textual content fields within the kind.
Utilizing this enum, we make the most of the @FocusState property wrapper to declare the selectedField property. This property permits us to conveniently monitor the at present centered textual content subject.
To determine the connection, every textual content subject is related to the centered modifier, which binds to the main focus state property utilizing the matching worth. For instance, when the main focus strikes to the “remark” subject, the binding units the sure worth to .remark.
Now you can check the code adjustments. If you faucet any of the fields, the console will show the title of the respective textual content subject. Nonetheless, should you faucet the Submit button, the console will present the message “No subject is chosen.”
You’re allowed to programmatically change the main focus of the textual content subject. Let’s change the motion block of the Submit button like this:
Button("Submit") {
    selectedField = .e mail
}
By setting the worth of selectedField to .e mail for the Submit button, the app will robotically shift the main focus to the e-mail subject when the Submit button is tapped.
Working with FocusedValue
Now that it is best to perceive how @FocusState works, let’s change over to the following property wrapper @FocusedValue. This property wrapper permits builders to watch the worth of the at present focus textual content subject (or different focusable views).
To higher perceive the utilization, let’s proceed to work on the instance. Let’s say, we wish to add a preview part under the shape that shows the person’s remark, however we solely need the remark to be seen when the remark subject is concentrated. Beneath is the pattern code of the preview part:
And, we put the preview proper under the Submit button like this:
struct FocusStateDemoView: View {

    ...

    var physique: some View {
        VStack {

            .
            .
            .

            Button("Submit") {
                selectedField = nil
            }
            .controlSize(.extraLarge)
            .buttonStyle(.borderedProminent)

            Spacer()

            CommentPreview()
        }
        .padding()
        .onChange(of: selectedField) { oldValue, newValue in
            print(newValue ?? "No subject is chosen")
        }
    }
}
As a way to monitor the change of the remark subject, we first create a struct that conforms to the FocusedValueKey protocol. Within the struct, we outline the kind of the worth to look at. On this case, remark has a kind of String.
Subsequent, we offer an extension for FocusedValues with a computed property that makes use of the brand new key to get and set values.
extension FocusedValues {
    var commentFocusedValue: CommentFocusedKey.Worth? {
        get { self[CommentFocusedKey.self] }
        set { self[CommentFocusedKey.self] = newValue }
    }
}
After getting all these arrange, you possibly can connect the focusedValue modifier to the “remark” textual content subject and specify to look at the remark’s worth.
Now return to the CommentPreview struct and declare a remark property utilizing the @FocusedValue property wrapper:
struct CommentPreview: View {

    @FocusedValue(.commentFocusedValue) var remark

    var physique: some View {
        VStack {
            Textual content(remark ?? "Not centered")
        }
        .body(minWidth: 0, maxWidth: .infinity)
        .body(top: 100)
        .padding()
        .background(.yellow)
    }
}
We make the most of the @FocusedValue property wrapper to watch and retrieve the latest worth of the remark subject when it’s in focus.
Now, as you kind any textual content within the remark subject, the preview part ought to show the identical worth. Nonetheless, if you navigate away from the remark subject, the preview part will show the message “Not centered.”
Utilizing @FocusedObject
@FocusedValue is used to watch the change of a price kind. For reference kind, you should utilize one other property wrapper referred to as @FocusedObject. Let’s say, on high of the remark subject, you wish to show the content material of the title and e mail fields within the preview part.
To do this, you possibly can outline a category that conforms to the ObservableObject protocol like this:
class FormViewModel: ObservableObject {
    @Printed var title: String = ""
    @Printed var e mail: String = ""
    @Printed var remark: String = ""
}
Within the kind view, we are able to declare a state object for the view mannequin:
@StateObject personal var viewModel: FormViewModel = FormViewModel()
To affiliate the observable object with the main focus, we connect the focusedObject modifier to the textual content fields like under:
This tutorial explains the way to use SwiftUI’s focus administration API, particularly @FocusState, @FocusedValue, and @FocusedObject. By leveraging these wrappers, you possibly can effectively monitor adjustments in focus state and entry the values of focusable views. These highly effective instruments allow builders to ship enhanced person experiences throughout varied platforms, together with iOS, macOS, and tvOS purposes.
I hope you get pleasure from this tutorial. When you have any questions, please depart me remark under.
Evaluation of a phishing marketing campaign concentrating on 1000’s of presidency contractors, dubbed “Operation Uncle Sam,” takes benefit of some subtle steps to keep away from detection.
Right now, Google launched a brand new Chrome emergency safety replace to patch a zero-day vulnerability tagged as exploited assaults.
“Google is conscious that an exploit for CVE-2024-7971 exists within the wild,” the corporate stated in an advisory printed on Wednesday.
This high-severity zero-day vulnerability is attributable to a sort confusion weak point in Chrome’s V8 JavaScript engine. Safety researchers with the Microsoft Menace Intelligence Heart (MSTIC) and Microsoft Safety Response Heart (MSRC) reported it on Monday.
Though such safety flaws can generally allow attackers to set off browser crashes after knowledge allotted into reminiscence is interpreted as a distinct sort, they will additionally exploit them for arbitrary code execution on focused units working unpatched browsers.
Google has fastened the zero-day with the discharge of 128.0.6613.84/.85 for Home windows/macOS and 128.0.6613.84 (Linux), variations that can roll out to all customers within the Secure Desktop channel over the approaching weeks.
Whereas Chrome updates routinely when safety patches can be found, customers can even velocity up the method by going to the Chrome menu > Assist > About Google Chrome, letting the replace end, and clicking the ‘Relaunch’ button to put in it.
Right now’s replace was instantly out there when BleepingComputer regarded for brand spanking new updates at present.
Regardless that Google confirmed the CVE-2024-7971 vulnerability was utilized in assaults, the corporate has but to share further data concerning in-the-wild exploitation.
“Entry to bug particulars and hyperlinks could also be saved restricted till a majority of customers are up to date with a repair,” Google stated.
“We may also retain restrictions if the bug exists in a 3rd occasion library that different tasks equally rely upon, however have not but fastened.”
CVE-2024-7971 is the ninth actively exploited Chrome zero-day patched by Google in 2024, with the entire record of zero-days fastened this 12 months together with:
CVE-2024-0519: A high-severity out-of-bounds reminiscence entry weak point inside the Chrome V8 JavaScript engine, permitting distant attackers to take advantage of heap corruption through a specifically crafted HTML web page, resulting in unauthorized entry to delicate data.
CVE-2024-2887: A high-severity sort confusion flaw within the WebAssembly (Wasm) commonplace. It might result in distant code execution (RCE) exploits leveraging a crafted HTML web page.
CVE-2024-2886: A use-after-free vulnerability within the WebCodecs API utilized by net purposes to encode and decode audio and video. Distant attackers exploited it to carry out arbitrary reads and writes through crafted HTML pages, resulting in distant code execution.
CVE-2024-3159: A high-severity vulnerability attributable to an out-of-bounds learn within the Chrome V8 JavaScript engine. Distant attackers exploited this flaw utilizing specifically crafted HTML pages to entry knowledge past the allotted reminiscence buffer, leading to heap corruption that might be leveraged to extract delicate data.
CVE-2024-4671: A high-severity use-after-free flaw within the Visuals element that handles the rendering and displaying of content material within the browser.
CVE-2024-4761: An out-of-bounds write downside in Chrome’s V8 JavaScript engine, which is accountable for executing JS code within the software.
CVE-2024-4947: Kind confusion weak point within the Chrome V8 JavaScript engine enabling arbitrary code execution on the goal system.
CVE-2024-5274: A sort confusion Chrome’s V8 JavaScript engine that may result in crashes, knowledge corruption, or arbitrary code execution
In the event you used the Disk Utility or diskutil command to take away a Linux partition, then there’s a pretty good probability the sort for the partition containing macOS was modified to FFFFFFFF-FFFF-FFFF-FFFF-FFFFFFFFFFFF. Apparently, you didn’t take away the Ubuntu boot (GRUB) information from the EFI partition. Once you boot your Mac, the firmware will solely detect these Ubuntu boot information which is why your Mac is booting to GRUB. Because the partition containing macOS is the improper sort, you’ll not be allowed as well to common macOS Restoration. Booting to Web Restoration shouldn’t be the one option to appropriate the partition sort. For instance, you may make a bootable Ubuntu Dwell flash drive. After booting from the flash drive, you should utilize the gdisk command to appropriate sort partition sort. Notice that gdisk makes use of codes to characterize sort partition sort GUIDs. In your case, you will have the code for APFS which is AF0A. Or, you’ll be able to enter the precise APFS GUID of 7C3457EF-0000-11AA-AA11-00306543ECAC.
Tips on how to Use the gdisk Command
Enter the lsblk command. From the output, decide the title of the interior drive the place Ubuntu is put in. This often can be both sda or nvme0n1. Right here I’ll assume nvme0n1.
Enter the next command. In case your title from from the earlier step is completely different from nvme0n1, then make the suitable substitution.
sudo gdisk /dev/nvme0n1
The gdisk command is interactive. Enter the values proven within the first column of the desk.
Entry
Kind
Remark
p
command
Print the partition desk
t
command
Change a partition’s sort code
2
parameter
Partition quantity (In case your partition quantity is completely different, then make the suitable substitution.)


 Evaluation of a


