“We have now numerous … enterprise knowledge middle prospects which were utilizing bi-directional optics for a lot of generations, and that is the subsequent technology of that characteristic,” mentioned Invoice Gartner, senior vice chairman and normal supervisor of Cisco’s optical techniques and optics enterprise. “The 400G lets buyer use their present fiber infrastructure and reduces fiber rely for them to allow them to use one fiber as a substitute of two, for instance,” Gartner mentioned.
“What’s actually modified within the final yr or so is that with AI buildouts, there’s a lot, rather more optics which might be a part of 400G and 800G, too. For AI infrastructure, the 400G and 800G optics are actually the dominant optics going ahead,” Gartner mentioned.
New AI Pods
Taking intention at next-generation interconnected compute infrastructures, Cisco expanded its AI Pod providing with theNvidia RTX 6000 Professional and Cisco UCS C845A M8 server bundle.
Cisco AI Pods are preconfigured, validated, and optimized infrastructure packages that prospects can plug into their knowledge middle or edge environments as wanted. The Pods embody Nvidia AI Enterprise, which options pretrained fashions and growth instruments for production-ready AI, and are managed via Cisco Intersight. The Pods are based mostly on Cisco Validated Design principals, which provide prospects pre-tested and validated community designs that present a blueprint for constructing dependable, scalable, and safe community infrastructures, in keeping with Cisco.
Constructing out the form of full-scale AI infrastructure compute techniques that hyperscalers and enterprises will make the most of is a large alternative for Cisco, mentioned Daniel Newman, CEO of The Futurum Group. “These are full-scale, full-stack techniques that might land in quite a lot of enterprise and enterprise service utility eventualities, which might be an enormous story for Cisco,” Newman mentioned.
Campus networking
For the campus, Cisco has added two new programable SiliconOne-based Sensible Switches: the C9350 Fastened Entry Sensible Switches and C9610 Modular Core. Each are constructed for AI workloads, similar to agentic AI, generative AI, automation and AR/VR.
Evaluations are important for assessing the standard, efficiency, and effectiveness of software program throughout improvement. Frequent analysis strategies embody code critiques and automatic testing, and may also help determine bugs, guarantee compliance with necessities, and measure software program reliability.
Nevertheless, evaluating LLMs presents distinctive challenges resulting from their complexity, versatility, and potential for unpredictable conduct.
Ankur Goyal is the CEO and Founding father of Braintrust Information, which supplies an end-to-end platform for AI software improvement, and has a concentrate on making LLM improvement strong and iterative. Ankur beforehand based Impira which was acquired by Figma, and he later ran the AI crew at Figma. Ankur joins the present to speak about Braintrust and the distinctive challenges of growing evaluations in a non-deterministic context.
Sean’s been an educational, startup founder, and Googler. He has revealed works protecting a variety of subjects from AI to quantum computing. At present, Sean is an AI Entrepreneur in Residence at Confluent the place he works on AI technique and thought management. You’ll be able to join with Sean on LinkedIn.
This episode of Software program Engineering Day by day is dropped at you by Capital One.
How does Capital One stack? It begins with utilized analysis and leveraging information to construct AI fashions. Their engineering groups use the facility of the cloud and platform standardization and automation to embed AI options all through the enterprise. Actual-time information at scale permits these proprietary AI options to assist Capital One enhance the monetary lives of its clients. That’s know-how at Capital One.
Study extra about how Capital One’s trendy tech stack, information ecosystem, and software of AI/ML are central to the enterprise by visiting www.capitalone.com/tech.
We have coated iOS localization in a number of tutorials, together with one which reveals find out how to totally localize an app utilizing String Catalogs. Nevertheless, these tutorials depend on the system language to find out the app’s language. However what if you wish to give customers the power to decide on their most well-liked language, whatever the system setting? And what in order for you the language to replace immediately—with out restarting the app? That’s precisely what this tutorial will train you.
Earlier than we get began, I like to recommend reviewing the sooner iOS localization tutorial if you happen to’re not accustomed to String Catalogs. The demo app used on this tutorial builds on the one from that information.
The Demo App
We’re reusing the demo app from our iOS localization tutorial—a easy app with fundamental UI parts as an example localization ideas. On this tutorial, we’ll lengthen it by including a Settings display that lets customers choose their most well-liked language. The app will then replace the language immediately, without having to restart.
Including App Languages and App Settings
Earlier than we begin constructing the Setting display, let’s first add an AppLanguage enum and an AppSetting class to the venture. The AppLanguage enum defines the set of languages that your app helps. Right here is the code:
enum AppLanguage: String, CaseIterable, Identifiable {
    case en, fr, jp, ko, zhHans = "zh-Hans", zhHant = "zh-Hant"

    var id: String { rawValue }

    var displayName: String {
        swap self {
        case .en: return "English"
        case .fr: return "French"
        case .jp: return "Japanese"
        case .ko: return "Korean"
        case .zhHans: return "Simplified Chinese language"
        case .zhHant: return "Conventional Chinese language"
        }
    }
}
Every case within the enum corresponds to a particular language, utilizing normal locale identifiers as uncooked values. For instance, .en maps to "en" for English, .fr to "fr" for French, and so forth. The displayName computed property offers a user-friendly label for every language. As a substitute of displaying uncooked locale codes like “en” or “zh-Hans” within the UI, this property returns readable names reminiscent of “English” or “Simplified Chinese language.”
The AppSetting class, which conforms to the ObservableObject protocol, is an easy observable mannequin that shops the person’s chosen language. Right here is the code:
class AppSetting: ObservableObject {
    @Printed var language: AppLanguage = .en
}
By default, the language is about to English. Later, when the person selects a special language from the Settings display, updating this property will trigger SwiftUI views that depend on the app’s locale to re-render utilizing the brand new language.
Constructing the Setting Display screen
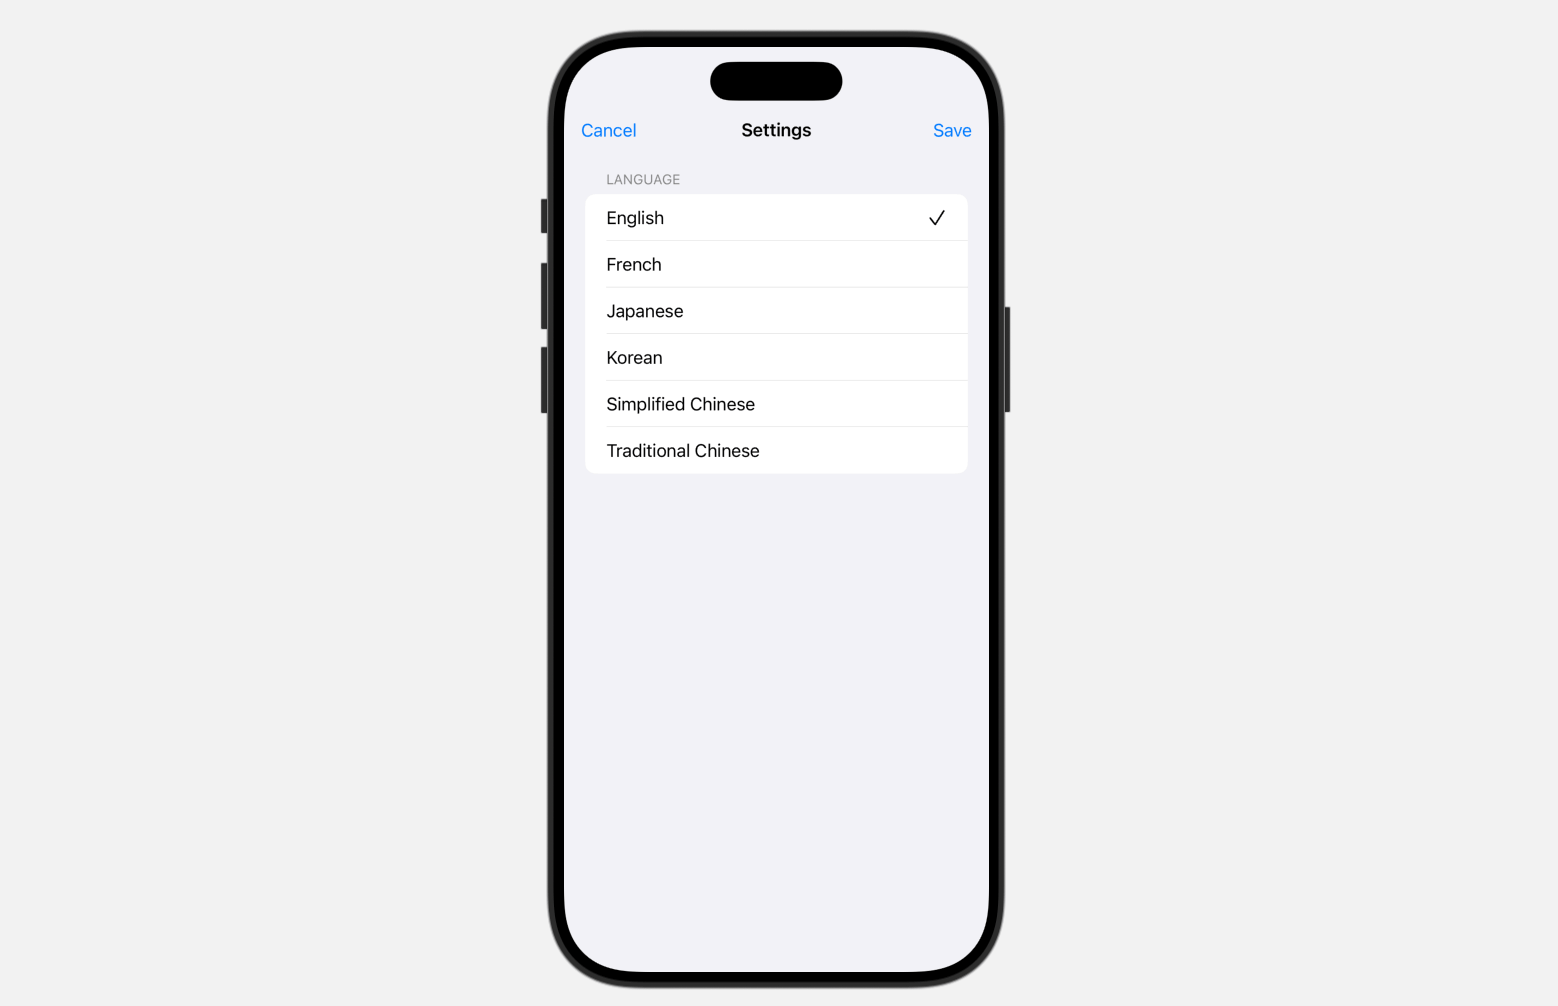
Subsequent, let’s construct the Settings display. It’s a easy interface that shows an inventory of all of the supported languages. Under is the code for implementing the setting view:
struct SettingView: View {

    @Surroundings(.dismiss) var dismiss

    @EnvironmentObject var appSetting: AppSetting

    @State non-public var selectedLanguage: AppLanguage = .en

    var physique: some View {
        NavigationStack {
            Kind {
                Part(header: Textual content("Language")) {
                    ForEach(AppLanguage.allCases) { lang in

                        HStack {
                            Textual content(lang.displayName)

                            Spacer()

                            if lang == selectedLanguage {
                                Picture(systemName: "checkmark")
                                    .foregroundColor(.major)
                            }

                        }
                        .onTapGesture {
                            selectedLanguage = lang
                        }
                    }
                }
            }

            .toolbar {
                ToolbarItem(placement: .topBarTrailing) {
                    Button("Save") {
                        appSetting.language = selectedLanguage
                        dismiss()
                    }
                }

                ToolbarItem(placement: .topBarLeading) {
                    Button("Cancel") {
                        dismiss()
                    }
                }
            }
            .navigationTitle("Settings")
            .navigationBarTitleDisplayMode(.inline)

        }
        .onAppear {
            selectedLanguage = appSetting.language
        }
    }
}

#Preview {
    SettingView()
        .environmentObject(AppSetting())
}
The view merely lists the accessible languages as outlined in AppLanguage. The at the moment chosen language reveals a checkmark subsequent to it. When the person faucets “Save,” the chosen language is saved to the shared AppSetting object, and the view is dismissed.
In the primary view, we add a Setting button and use the .sheet modifier to show the Setting view.
struct ContentView: View {
@EnvironmentObject var appSetting: AppSetting
@State non-public var showSetting: Bool = false
var physique: some View {
VStack {
HStack {
Spacer()
Button {
showSetting.toggle()
} label: {
Picture(systemName: "gear")
.font(.system(measurement: 30))
.tint(.major)
}
}
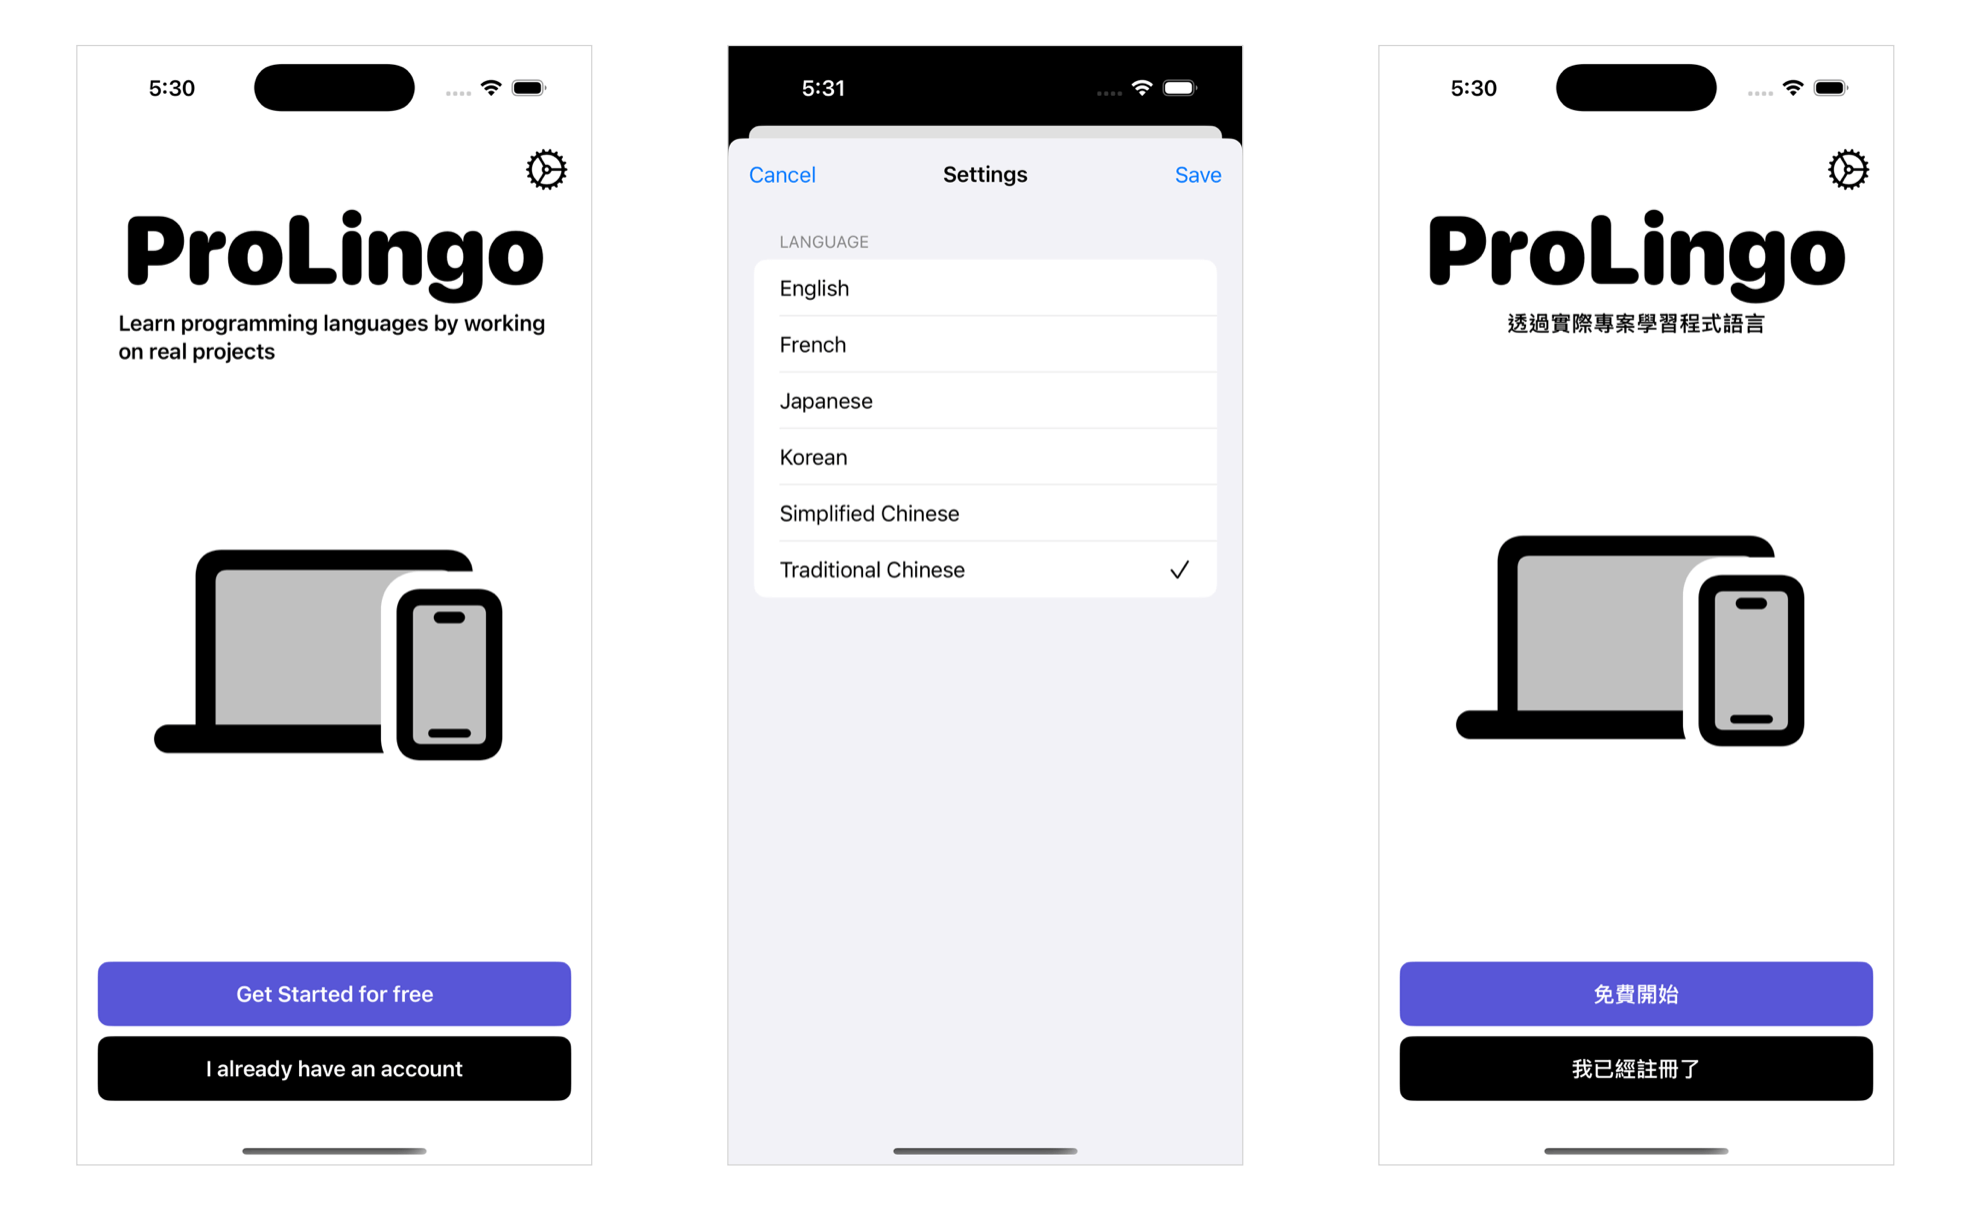
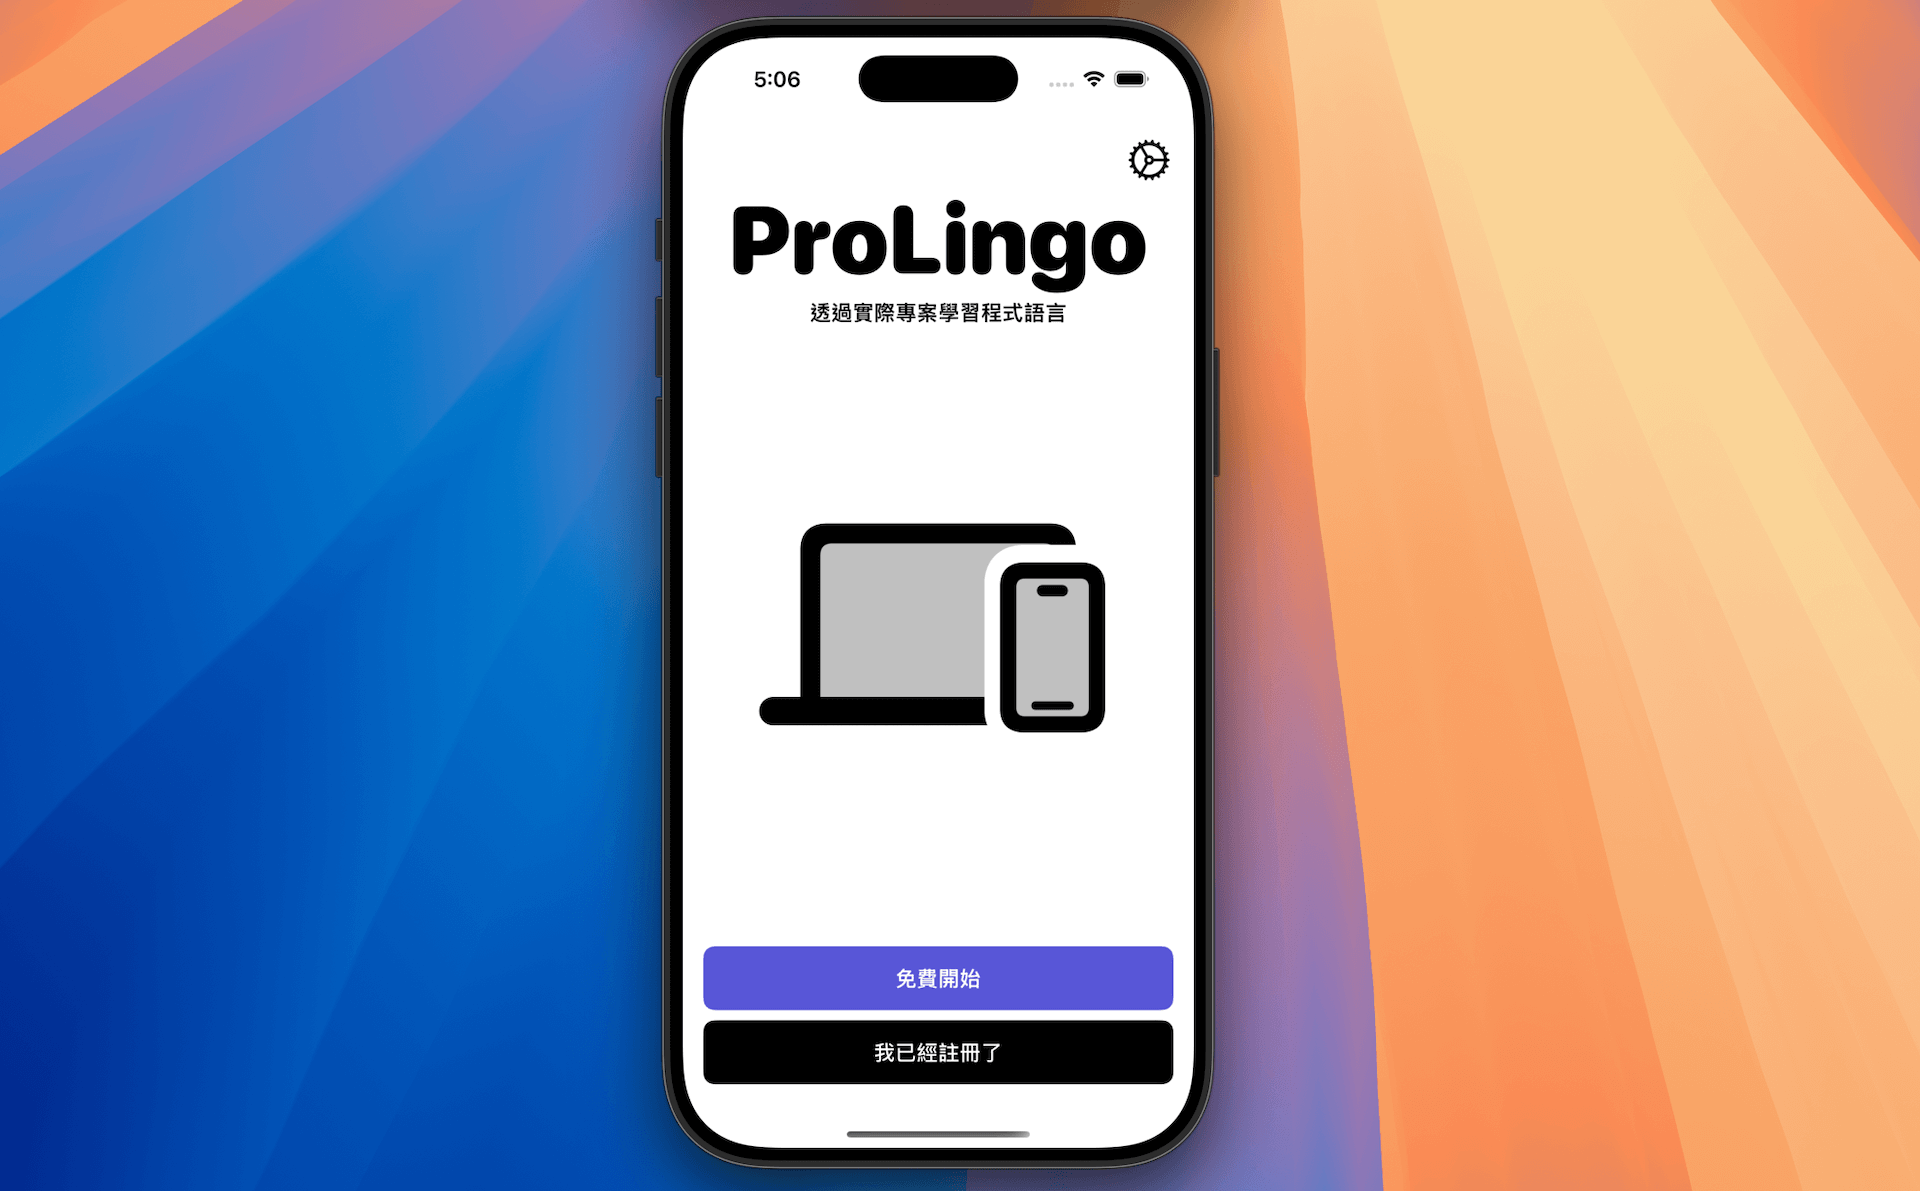
Textual content("ProLingo")
.font(.system(measurement: 75, weight: .black, design: .rounded))
Textual content("Study programming languages by engaged on actual initiatives")
.font(.headline)
.padding(.horizontal)
.
.
.
.
.
.
}
.padding()
.sheet(isPresented: $showSetting) {
SettingView()
.environmentObject(appSetting)
}
}
}
Enabling Actual-Time Language Adjustments
At this level, tapping the gear button will carry up the Settings view. Nevertheless, the app does not replace its language when the person selects their most well-liked language. To implement dynamic language switching, now we have to connect the .surroundings modifier to ContentView and replace the locale to match the person’s choice like this:
This line of code injects a customized Locale into the SwiftUI surroundings. The .locale key controls which language and area SwiftUI makes use of for localizable views like Textual content. The locale is about to match the language the person chosen in settings.
The app can now replace its language on the fly. For instance, open the Settings view and choose Conventional Chinese language. After saving your choice and returning to the primary view, you may see the UI immediately up to date to show all textual content in Conventional Chinese language.
Utilizing LocalizedStringKey
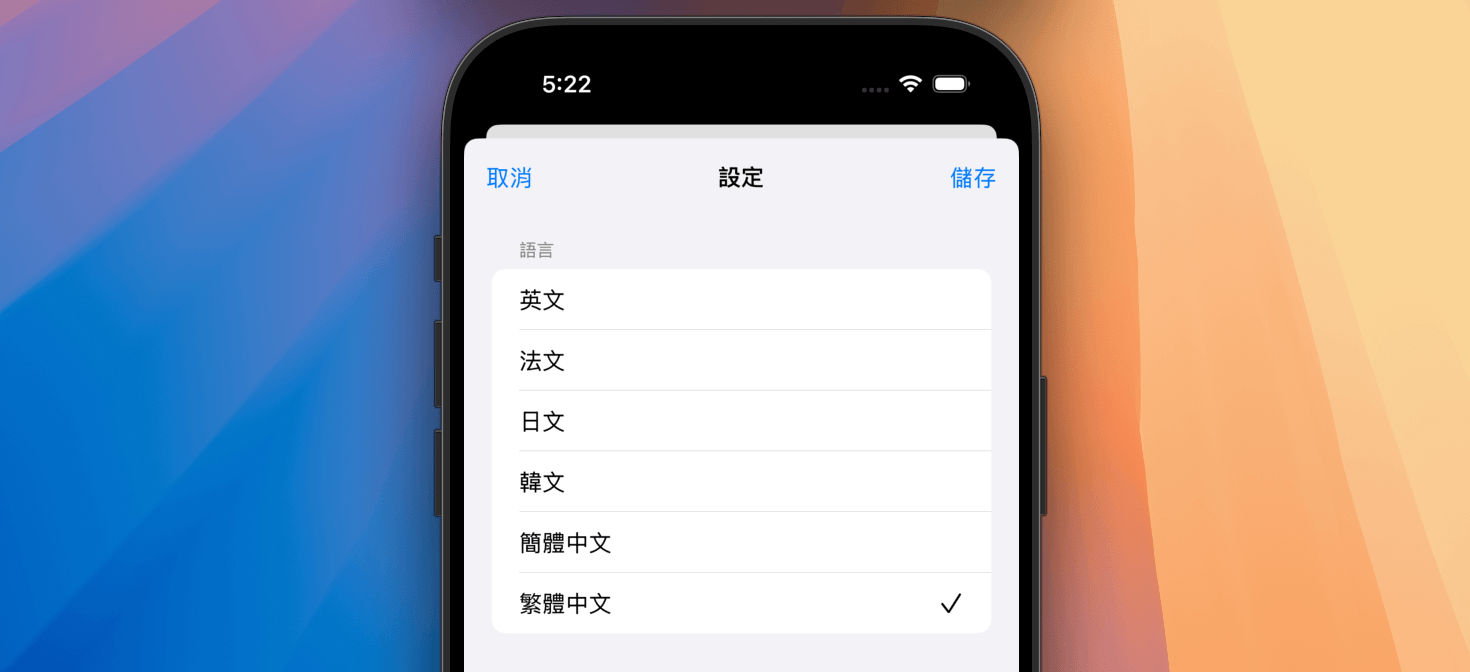
You could discover a bug within the app. After altering the language to Conventional Chinese language (or different languages) and reopening the Settings view, the language names nonetheless show in English.
Let’s check out the code that handles the show of language identify:
Textual content(lang.displayName)
You could marvel why the Textual content view doesn’t deal with the localization robotically. On this case, SwiftUI treats lang.displayName as a plain textual content, which suggests no automated localization occurs, even when the string matches a key within the String Catalog file. To make the localization work, it’s good to convert the String to a LocalizedStringKey like this:
Utilizing LocalizedStringKey triggers the localization lookup course of. While you run the app once more, you may see the language names within the Settings view displayed in your chosen language.
Abstract
On this tutorial, you discovered find out how to implement in-app language switching in iOS utilizing SwiftUI, permitting customers to alter languages with out restarting the app. We explored find out how to create a Settings display for language choice, enabled real-time localization updates, and discovered the significance of utilizing LocalizedStringKey for correct string localization.
The code and ideas offered right here present a basis for implementing language switching in your individual iOS apps. Be at liberty to adapt this strategy on your personal iOS apps that require multi-language assist.
As an illustration, cluster computing technique permits it to compete on the server degree on efficiency, mentioned Shrish Pant, director analyst at Gartner. Whereas the method could also be much less environment friendly by way of energy consumption, it’s efficient for a lot of purposes.
“Efficiency on a chip degree for Huawei’s 910C is roughly equal to Nvidia’s H100, and it may be a superb different to now-restricted Nvidia’s H20 chips in China, supplied the remainder of the items fall in place,” Pant mentioned. “Since Huawei can not entry the most recent and biggest tech in semiconductor manufacturing but, they’re innovating in instructions like non-Moore’s regulation method, and one of many examples is architectural modifications like becoming a member of two reticle-size GPU dies to double efficiency.”
The method additionally aligns with Huawei’s strengths. In cluster computing, the important thing problem usually lies not in constructing massive techniques however in optimizing community efficiency throughout nodes to method peak effectivity.
“Huawei is well-known for its networking capabilities and could also be utilizing proprietary software-defined networking capabilities that may speed up the cluster,” mentioned Hyoun Park, CEO and chief analyst of Amalgam Insights. “And there are mathematical methods, such because the well-publicized DeepSeek use of an 8-bit floating level for coaching somewhat than the 16-bit model usually utilized by most AI distributors.”
By simplifying mannequin coaching and making use of mathematical methods that commerce some accuracy for effectivity, Huawei might offset restricted processing capabilities by relying extra on energy availability and software program optimization.
Warning over sanctions
Huawei additionally has a vested curiosity in reducing expectations for its {hardware} on a world foundation, as it’s attempting to keep away from as many US and ally-based restrictions as attainable.
With Swift 6.2, Apple has made a a number of enhancements to Swift Concurrency and its approachability. One of many largest adjustments is that new Xcode tasks will now, by default, apply an implicit most important actor annotation to all of your code. This primarily makes your apps single-threaded by default.
I actually like this modification as a result of with out this modification it was far too simple to unintentionally introduce a great deal of concurrency in your apps.
On this publish I might wish to take a fast have a look at how one can management this setting in addition to the setting for nonisolated(nonsending) from Xcode 26’s construct settings menu.
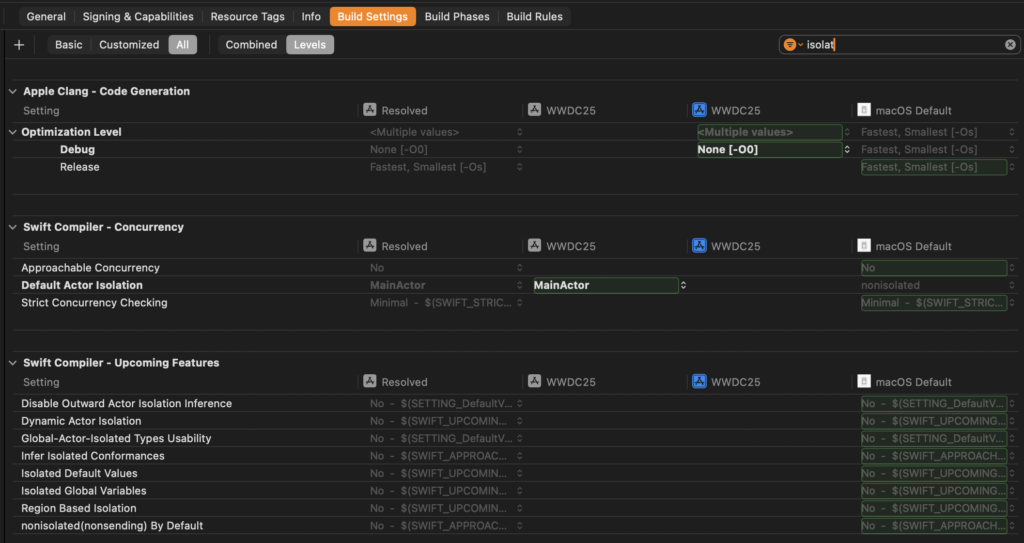
Setting your default actor isolation
Open your construct settings and search for “Default Actor Isolation”. You should use the search function to make it simpler to search out the setting.
New tasks can have this set to MainActor whereas present tasks can have this set to nonisolated. I extremely advocate making an attempt to set this to MainActor as an alternative. You will have to refactor a few of your code and apply express nonisolated declarations the place you meant to make use of concurrency so you will wish to allocate a while for this.
MainActor and nonisolated are the one two legitimate values for this setting.
Enabling nonisolated(nonsending)
One other function that is launched via Swift 6.2 is nonisolated(nonsending). This function makes it in order that your nonisolated sync features mechanically inherit the calling actor’s isolation as an alternative of at all times working on the worldwide executor with out being remoted to any actor. To get the outdated conduct again you may annotate your features with @concurrent. You’ll be able to be taught extra about this in my publish about Swift 6.2’s adjustments.
You’ll be able to activate nonisolated(nonsending) in one in every of two methods. You’ll be able to both allow the function flag for this function or you may activate “Approachable Concurrency”.
WIth Approachable Concurrency you’ll get nonisolated(nonsending) together with a few different adjustments that ought to make the compiler smarter and extra wise with regards to how concurrent your code will actually be.
For those who’re unsure which one you need to use I like to recommend that you just go for Approachable Concurrency.