
If you’re a developer, or simply interested by what the subsequent model of macOS will likely be like to make use of, you might have been operating the the beta of macOS Sequoia in your Mac. However what do you do while you now not need to run the beta?
If the beta is inflicting havoc together with your Mac, you might be fed up with having to put aside time every week whereas the most recent replace is put in, otherwise you simply need to return to the best way issues had been then it’s time to take away the macOS beta. Now it’s right here you would possibly need to simply run the total model of macOS Sequoia.
Fortunately as soon as Sequoia arrived the method for ‘downgrading’ turned less complicated. Previous to macOS Sequoia launching downgrading wasn’t as straightforward as you would possibly suppose. We clarify what it’s worthwhile to do if you wish to revert from a beta in the course of the early testing course of beneath.
We’ll run by means of the complicated course of for reverting from the macOS Sequoia beta to macOS Sonoma (which can apply when Apple begins growing the subsequent model of macOS in June 2025), earlier than operating by means of the less complicated course of for reverting from the macOS Sequoia beta to the total macOS Sequoia.
If it’s the iOS beta program you want to go away learn: Learn how to take away an iOS beta out of your iPhone.
Learn how to cease getting the macOS Sequoia beta
If you’re operating the macOS Sequoia beta and need to set up the brand new model of macOS Sequoia now that it has launched, the method to revert to the total model is comparatively easy.
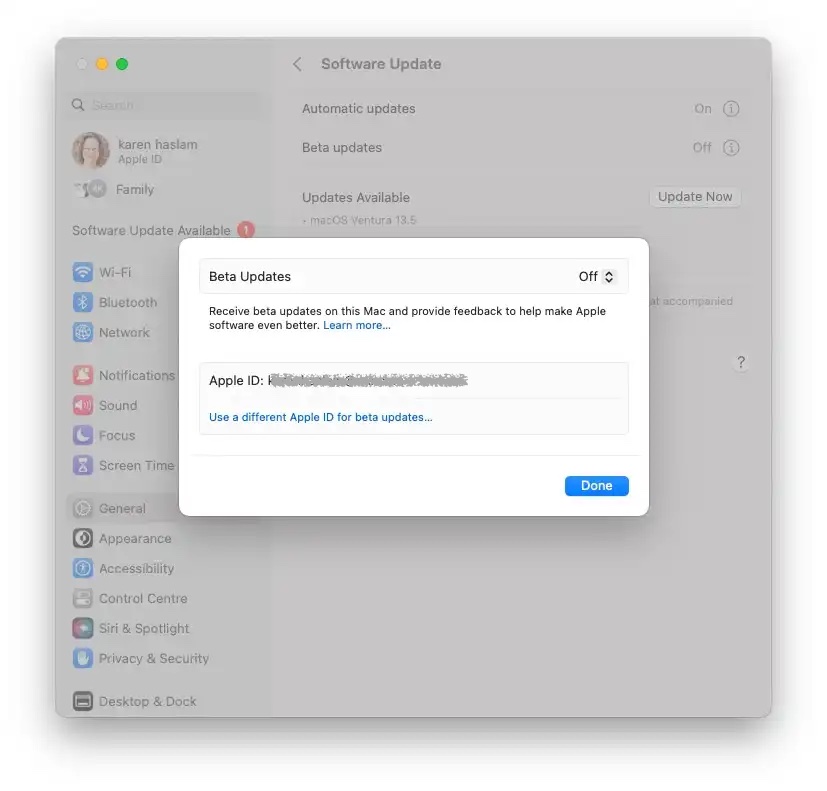
The very first thing to do is take away your self from Apple’s macOS beta program as this can cease the beta updates from arriving in your Mac.
- Open System Settings.
- Click on on Normal.
- Click on on Software program Replace.
- Click on the i beside Beta updates and ensure it’s set to off.
Now that you’ve left the Beta program the subsequent model of macOS that’s provided to you through System Settings will likely be a full model of macOS and it is possible for you to to put in that as typical.
It’s barely extra difficult in case you are operating a more recent model of the beta than the official model. In that case, you may both watch for Apple to concern the subsequent macOS Sequoia replace and set up that as a substitute, or you may observe the steps beneath to revert to an older model of macOS.
When you don’t need to watch for that subsequent replace then you may set up macOS Sequoia utilizing macOS Restoration.
- To enter Restoration mode press and maintain the ability button whereas your Mac begins up and proceed to press and maintain the button till you see a startup choices window seem with an Choices icon. (On an older Mac you enter Restoration by urgent the Command and R buttons throughout start-up).
- Choose Choices and click on Proceed.
- macOS Utilities will open with the choice to Reinstall macOS [version]. Choose that possibility.
- Enter your password if required.
- Wait whereas set up takes place (don’t let the Mac fall asleep).
It’s possible you’ll must erase your disk, during which case it would be best to guarantee that vital paperwork are backed up (not in Time Machine as that will even copy the model of macOS you might be operating).
If this doesn’t be just right for you, do a clear set up following the steps beneath.
We have now extra recommendation about putting in macOS in your Mac right here and right here’s what to do for those who encounter issues putting in macOS.
Learn how to revert from macOS beta to the earlier macOS model
If you’re operating the beta of macOS Sequoia and need to downgrade again to Sonoma (or for those who begin operating the macOS 16 beta after June 2025 and need to revert to macOS Sequoia), attempt the next steps:
You have to to wipe your Mac first. You received’t be capable to set up the previous macOS excessive of the brand new macOS, sadly. This is the reason we at all times suggest making a backup prior to installing a beta, or any newer model of macOS.
Go away the beta program
Foundry
The very first thing to do is take away your self from Apple’s macOS Sequoia beta program as this can cease the beta updates from arriving in your Mac.
- Open System Settings.
- Click on on Normal.
- Click on on Software program Replace.
- Click on the i beside Beta updates and ensure it’s set to off.
It will cease any additional Sequoia updates being put in in your Mac, however if you wish to revert again to Sonoma you will want to wipe your Mac, as per the directions beneath.
Wipe your Mac

Foundry
Sadly, in case you are shifting from macOS Sequoia again to Sonoma you will want to erase all the info out of your Mac first. You can’t set up Sonoma on high of Sequoia.
Fortunately there’s an Erase All Content material and Settings possibility in System Settings that makes it straightforward to return your Mac to manufacturing facility settings.
To seek out the Erase All Content material and Settings possibility open System Settings > Normal > click on on Reset > click on Erase All Contents and Settings.
When you click on on Erase All Content material and Settings all the things will likely be taken care of. We run by means of the method in additional element right here: Learn how to manufacturing facility reset a MacBook or Mac.
Simply observe that in the course of the course of any Bluetooth keyboards or mice will likely be disconnected, so if in case you have wired choices they are going to be useful. When you don’t have a wired mouse or keyboard you need to get an possibility to attach your Bluetooth peripherals when the Mac restarts.
In case your Mac doesn’t have an M-series chip or a T2 chip the method to wipe it’s a bit completely different (and described within the story linked to above).
Reinstall macOS

Foundry
As soon as your Mac has been wiped and reset to manufacturing facility settings it ought to restart operating the most recent full model of macOS that’s suitable together with your Mac.
You have to to hitch your Wi-Fi community and join your mouse and keyboard if they’re Bluetooth.
Finally, you’ll finally see an Activate Mac display screen. Click on on Restart.
On restarting your Mac will information you thru steps to set it up as if it was the primary time.
Get better your Mac through Time Machine
Foundry
After your content material and setting have been eliminated out of your Mac you may both set it up as new, or you may get well a Time Machine backup together with your knowledge from earlier than your beta journey.
This backup needs to be from earlier than you put in the beta or you’ll simply reinstall the beta.
When you have wiped your Mac and are setting it up as new, recovering your previous settings and knowledge through a Time Machine backup is very easy.
- In the course of the setup course of you can be requested if in case you have a Time Machine backup. Simply say sure.
- Plug in your backup drive and go away the Mac because it recovers the info from the Time Machine backup.
- As soon as it has carried out that your Mac will likely be as near what it was earlier than you put in the beta.
Alternatively, for those who resolve to get well your Time Machine backup afterward, you are able to do so utilizing macOS Restoration.
- Plug within the onerous drive on which your Time Machine backup is situated.
- Restart your Mac.
- When you have an M1-Sequence Mac it’s worthwhile to press and maintain the ability button till you see the Loading startup choices display screen at which level click on on Choices after which Proceed. See Learn how to begin a Mac in Restoration mode. (On an Intel-powered Mac maintain down Command + R till the Apple brand seems.)
- Now you might be in macOS Restoration, you’ll see the choice to Restore out of your Time Machine Backup. Choose that and click on Proceed.
- Select your Backup supply and click on on Proceed once more.
- Select the right backup – the final one from earlier than you put in the beta. (You may examine this by trying on the macOS model column).
We have now a information to restoring from Time Machine right here.
What to do in case your Mac received’t obtain Sonoma
Screenshot
Foundry
When you discover that Sonoma isn’t accessible to obtain through Software program Replace–maybe as a result of your Mac erroneously believes it’s already operating the software program–you may trick your Mac into downloading the total model of the software program and putting in it by utilizing the Mac App Retailer.
- Open the Mac App Retailer.
- Click on right here for Sonoma.
- Click on on Get and your Mac will supply to obtain the installers.
- The Software program Replace window from System Settings/System Preferences will open. Affirm that you just need to obtain the software program, you’ll additionally see a warning that you’re downloading an older model of the OS, ignore it.
- Wait whereas the macOS downloads – it could take some time, and in case your web connection drops you may need to start out once more.
- As soon as it’s downloaded click on on Open and wait whereas it installs. Anticipate this to take some time…
You might even see a message that the software program is already put in. Simply verify that you just do need to go forward with the obtain and after you have the installer it is possible for you to to put in the ultimate model over the beta.
Learn how to revert to an previous macOS utilizing Restoration
It might even be attainable to obtain and set up an older OS utilizing the built-in Restoration mode. But it surely relies on what model you might be reverting to. We run by means of how to do that right here: Learn how to reinstall macOS utilizing Restoration Mode.
Right here’s reinstall the newest suitable model of macOS in your Mac utilizing Restoration:
- Restart your Mac.
- On an M1/M2-Sequence Mac it’s worthwhile to press and maintain the ability button till you see the Loading startup choices display screen at which level click on on Choices after which Proceed. On an Intel-powered Mac maintain down Possibility + Command + R till the Apple brand seems. See Learn how to begin a Mac in Restoration mode.
- You’ll see the choice Reinstall macOS. Click on on this and Restoration will set up the newest model of macOS that’s suitable together with your Mac.
Alternatively, for those who don’t need to return to Sonoma, press Shift + Possibility + Command + R (on an Intel Mac) to reinstall the model of macOS that was put in in your Mac while you bought it.