
Involved about updating your Mac to the most recent model of macOS? Maybe you aren’t positive about operating macOS Sequoia fairly but, or possibly you need to check the beta however don’t need to danger messing up your system. You is perhaps involved about incompatible software program otherwise you may simply be pondering that you just may hate it and never be capable of return to the macOS you might be acquainted with.
Fortunately you don’t have to put in the OS replace in your Mac in any respect. You possibly can set up it on an exterior drive as an alternative.
Putting in the Mac working system on an exterior drive is the most secure method to get a very good take a look at a brand new OS with out altering something in your Mac. It’ll depart your present configuration intact and can help you mess around with the beta of the subsequent model of macOS.
On this tutorial we clarify easy methods to run macOS from an exterior drive in 4 easy steps:
- Put together the exterior drive for the set up utilizing Disk Utility.
- Get the macOS set up information. We’ll present you the way.
- Set up macOS on the exterior drive.
- Run macOS on the exterior drive by urgent Alt/Possibility at begin up on an Intel-powered Mac, or urgent and holding the on change on an M1 or M2-series Mac.
What you want
If you wish to run macOS on an exterior drive you will have just a few issues, together with a drive with a very good quantity of storage obtainable.
You need to use an exterior onerous drive or SSD–and SSD provides sooner boot occasions than a tough drive. It’s additionally price investing in a USB-C or Thunderbolt drive as this can provide the quickest connection.
You will get maintain of a USB flash stick fairly cheaply, resembling this San Disk USB Sort-C drive with 128GB for $24/£16.49. It’s a bit more durable to discover a Thunderbolt-powered SSD, and sadly, they’re much more costly. Check out our round-up of the finest SSDs. If you wish to use the exterior set up as if you’re operating it in your Mac we propose you get the largest USB C/Thunderbolt drive you may afford.
For extra shopping for recommendation, check out our information to the finest exterior drives for Mac for some cheaper, non-SSD choices.
Troubleshooting issues with M-series Macs
Earlier than we transfer on to how one can create this exterior set up of macOS, we are going to point out some points individuals had when making an attempt to create such an set up for an M-series Mac.
After the primary M1 Macs launched in 2020, it emerged that there was an issue with the USB interface. Because of this, some customers encountered issues making an attempt to put in macOS on and booting from SSDs linked through USB. This difficulty was shortly addressed in an OS replace, however for those who discover it impacts you we propose that you just do the next:
- Strive a special port. For some it has labored to put in on a disk linked through USB-A connector, however not USB-C, whereas the state of affairs has been vice versa for others.
- One other answer is to make use of a drive that makes use of Thunderbolt slightly than USB (the port seems the identical, however the usual is totally different). It ought to be linked on to the pc, not through a dock. That drive will want a very good quantity of house (again after we began operating Mojave beta on a 32GB stick we discovered it wasn’t sufficient as soon as we began utilizing iCloud Desktop and different options that meant that our information began being downloaded).
One other difficulty price flagging is that for those who had been hoping to make use of this boot drive to run older variations of macOS on M1 Macs sadly it isn’t doable because the M1 Mac can solely run the ARM model of Large Sur.
Step 1: Put together the drive for set up
Comply with these directions to arrange your exterior drive – observe that there could also be some slight adjustments to the method for those who want to set up macOS Ventura or the most recent macOS beta.
- Join the exterior drive to your Mac.
- Launch Disk Utility (press Cmd + spacebar and begin to sort Disk Utility).
- Earlier than this subsequent step: if you’re operating Excessive Sierra or later you will have to click on on the View drop-down. Select Present All Gadgets from the choices. Now you will notice the basis drive along with the exterior quantity under it.
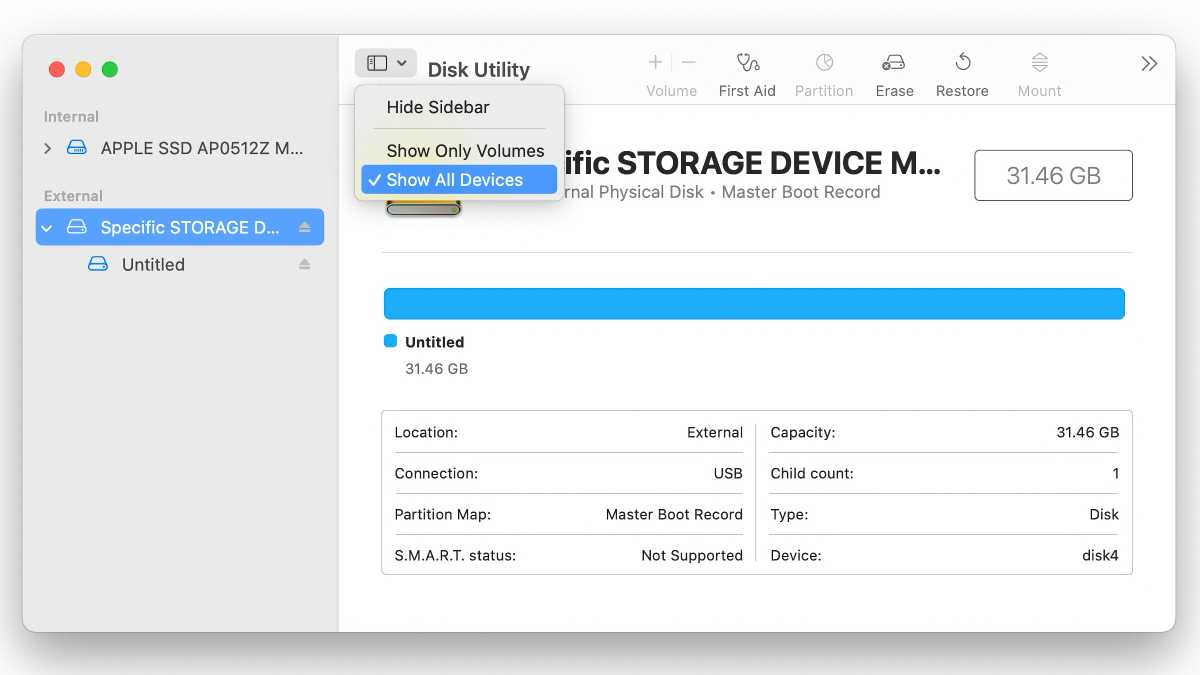
The Disk Utility app in Sonoma.

The Disk Utility app in Sonoma.
Foundry
The Disk Utility app in Sonoma.
Foundry
Foundry
- Choose the Exterior drive within the sidebar (the subsequent step received’t work for those who solely choose the amount–for instance, within the screenshot above it is advisable choose the Particular Storage, not Untitled).
- Click on on Erase (it is advisable erase the drive so you may reformat it correctly).
- Give your drive a reputation resembling “macOS Sequoia” or “USB”.
- Select APFS because the Format.
- Click on on Erase.
- Wait whereas Disk Utility creates the partition and units up the drive (this could take a couple of minutes).
- Then click on Executed.
Now you will notice that your exterior storage has been renamed with the identify you select and it will likely be prepared so that you can set up the macOS on it–however there’s something else it is advisable do first.
Step 2: Get the macOS set up information
This step will depend upon whether or not you need to run a macOS beta, a full model of macOS, and even an older Mac OS X.
Whether or not you need to get the macOS Sequoia or the most recent beta set up information the method is much like that detailed under. When the 2024 model of macOS turns into obtainable to obtain you need to be capable of get the set up information through Software program Replace or the Mac App Retailer.
Right here’s easy methods to get the macOS Sequoia installer:
- To obtain the macOS installer click on right here to go to the Ventura web page on the Mac App Retailer.
- Click on on Get to obtain the installer.
- Software program Replace will search after which, if you’re already operating Ventura it’s going to ask you to verify that you just do need to obtain macOS Ventura.
- Click on on Obtain.
Keep in mind that you simply need to obtain the software program, not set up it, at this stage.
If it’s a full model of an older model of macOS you might be after, we clarify easy methods to get the set up information for macOS right here.
In case you are after a beta of macOS, you will have to join the beta in your Mac and obtain the beta information. After you have the information you’ll need to set up them on the exterior drive slightly than your Mac, so watch out. We now have a
full information to getting the macOS beta right here. The beta information are about 12GB.
Step 3: Set up macOS on the exterior drive
Now to put in the beta or different model of the Mac working system in your exterior drive.
- Open a finder window, go to Functions and discover the Sequoia installer (or whichever model of macOS you need to run). You can even discover it through the use of Highlight (press Command+spacebar and begin typing the identify of the OS)
- Click on on the installer.
- A window ought to open (verify the Dock if not). It’ll invite you to arrange the set up of macOS Sequoia (or no matter) and click on Proceed.
- Comply with the software program license settlement.
- Subsequent–that is vital–click on on Present All Disks. Don’t click on on House as you don’t need to set up in your important drive.
- Click on on the exterior drive.
- Click on Set up.
Wait whereas the model of macOS installs on the drive. This course of might take some time–it all the time takes longer than the estimated time.
Be aware: This won’t work for those who didn’t set your exterior drive up appropriately as a GUID Partition as per the steps above.
Step 4: Run macOS on the exterior drive
There are two methods to run the model of macOS out of your exterior drive
Both:
- Open System Desire > Startup Disk or System Settings > Basic > Startup Disk.
- Choose the exterior drive you want to use to begin up the Mac and click on Restart.
Or:
- Maintain down Possibility/Alt throughout startup on an Intel-powered Mac, or press and maintain the on button on an M-series Mac till you see the start-up choices.
- Choose the drive you want to use to begin up the Mac.
After you have put in the macOS you need on the drive it ought to be straightforward to put in subsequent updates there through System Preferences.
For extra recommendation about putting in macOS or Mac OS X learn Easy methods to replace the Mac working system and Easy methods to set up previous variations of OS X on a Mac.