Home Blog

The best way to save pictures to the cellphone gallery on an IOS System in flutter?


‘I’m utilizing the saver_gallery bundle of Flutter to save lots of pictures into my cellphone gallery on each IOS and android. I’m utilizing the picture picker bundle to take the picture utilizing digicam. After I save the picture in my app, I can see it’s there within the gallery on an android cellphone however it’s failing on an IOS gadget. Additionally if I reopen the app on the IOS gadget neither can I see that picture on my app as effectively.’

Future checkAndRequestPermissions({required bool skipIfExists}) async 
  {
  if (!Platform.isAndroid && !Platform.isIOS) 
  {
    return false; // Solely Android and iOS platforms are supported
  }

  if (Platform.isAndroid) {
    ultimate deviceInfo = await DeviceInfoPlugin().androidInfo;
    ultimate sdkInt = deviceInfo.model.sdkInt;

    if (skipIfExists) {
      // Learn permission is required to examine if the file already exists
      return sdkInt >= 33
          ? await Permission.pictures.request().isGranted
          : await Permission.storage.request().isGranted;
    } else {
      // No learn permission required for Android SDK 29 and above
      return sdkInt >= 29 ? true : await Permission.storage.request().isGranted;
    }
  } else if (Platform.isIOS) {
    // iOS permission for saving pictures to the gallery
    return skipIfExists
        ? await Permission.pictures.request().isGranted
        : await Permission.photosAddOnly.request().isGranted;
  }

  return false; // Unsupported platforms
}

Future saveImageToGallery(File imageFile, String imageName, {bool skipIfExists = false}) async{
  
  ultimate hasPermissions = await checkAndRequestPermissions(skipIfExists: skipIfExists);
  if(!hasPermissions){
    print("Permission Denied");
    return;
  }

  ultimate savedImage = await SaverGallery.saveFile(
    filePath: imageFile.path, 
    fileName: "$imageName.jpg", 
    androidRelativePath: "Footage/my_app",
    skipIfExists: skipIfExists);

   if(savedImage.isSuccess == true) {
    print(imageFile.path);
   } else{
    print("Failed");
   }
}

/* That is my operate to take a picture utilizing camersa*/

Future addImageFromCamera() async {
    ultimate pickedImage = await imagePick.pickImage(supply: ImageSource.digicam);
    return pickedImage != null ? File(pickedImage.path) : null;
  }

‘That is my code for a similar. I’m utilizing the very same code they’ve used within the pub.dev web page of the saver_gallery bundle, solely I’m utilizing a file as an alternative of picture bytes. I consider the picture is saved quickly and it’s deleted later which is why I cant see it within the app as effectively. If anybody can please assist me with this it will be of nice assist. Thanks upfront.’

Integrating Siri Shortcuts into SwiftUI Apps with App Intents


Have you ever ever puzzled the best way to make your app’s options accessible from the built-in Shortcuts app on iOS? That’s what the App Intents framework is designed for. Launched in iOS 16 and macOS Ventura, the framework has been round for over two years. It offers builders with a strong technique to outline actions that customers can set off by means of Shortcuts. With App Intents, your app can combine seamlessly with the Shortcuts app, Siri, and even system-wide Highlight search.

On this tutorial, we’ll discover the best way to use the App Intents framework to convey your app’s performance into Shortcuts by creating an App Shortcut. Utilizing the Ask Me Something app as our instance, we’ll stroll by means of the method of letting customers ask questions proper from Shortcuts.

This tutorial assumes you are conversant in the Ask Me Something app from our Basis Fashions tutorial. If you have not learn it but, please evaluate that tutorial first.

Utilizing App Intents

The Ask Me Something app permits customers to ask questions after which it offers solutions utilizing the on-device LLM. What we’re going to do is to show this function to the Shortcuts app. To try this, all it is advisable to do is to create a brand new Struct and undertake the App Intents framework.

Let’s create a brand new file named AskQuestionIntent within the AskMeAnything venture and replace its content material like under:

import SwiftUI
import AppIntents

struct AskQuestionIntent: AppIntent {
    static var title: LocalizedStringResource = "Ask Query"
    static var description = IntentDescription("Ask a query to get an AI-powered reply")
    
    static let supportedModes: IntentModes = .foreground
    
    @Parameter(title: "Query", description: "The query you wish to ask")
    var query: String
    
    @AppStorage("incomingQuestion") var storedQuestion: String = ""
    
    init() {}
    
    init(query: String) {
        self.query = query
    }
    
    func carry out() async throws -> some IntentResult {
        storedQuestion = query
        
        return .outcome()
    }
}

The code above defines a struct known as AskQuestionIntent, which is an App Intent utilizing the AppIntents framework. An App Intent is mainly a approach to your app to “speak” to the Shortcuts app, Siri, or Highlight. Right here, the intent’s job is to let a consumer ask a query and get an AI-powered reply.

On the high, we now have two static properties: title and description. These are what the Shortcuts app or Siri will present the consumer once they take a look at this intent.

The supportedModes property specifies that this intent can solely run within the foreground, which means the app will open when the shortcut is executed.

The @Parameter property wrapper defines the enter the consumer wants to offer. On this case, it is a query string. When somebody makes use of this shortcut, they will be prompted to kind or say this query.

The @AppStorage("incomingQuestion") property is a handy technique to persist the offered query in UserDefaults, making it accessible to different components of the app.

Lastly, the carry out() operate is the place the intent truly does its work. On this instance, it simply takes the query from the parameter and saves it into storedQuestion. Then it returns a .outcome() to inform the system it’s completed. You’re not doing the AI name instantly right here — simply passing the query into your app so it may well deal with it nevertheless it needs.

Dealing with the Shortcut

Now that the shortcut is prepared, executing the “Ask Query” shortcut will robotically launch the app. To deal with this habits, we have to make a small replace to ContentView.

First, declare a variable to retrieve the query offered by the shortcut like this:

@AppStorage("incomingQuestion") non-public var incomingQuestion: String = ""

Subsequent, connect the onChange modifier to the scroll view:

ScrollView {

...


}
.onChange(of: incomingQuestion) { _, newQuestion in
    if !newQuestion.isEmpty {
        query = newQuestion
        incomingQuestion = ""
        
        Activity {
            await generateAnswer()
        }
    }
}

Within the code above, we connect an .onChange modifier to the ScrollView so the view can reply every time the incomingQuestionvalue is up to date. Contained in the closure, we examine whether or not a brand new query has been obtained from the shortcut. In that case, we set off the generateAnswer() technique, which sends the query to the on-device LLM for processing and returns an AI-generated reply.

Including a Preconfigured Shortcut

In essence, that is the way you create a shortcut that connects on to your app. If you happen to’ve explored the Shortcuts app earlier than, you’ve most likely seen that many apps already present preconfigured shortcuts. As an example, the Calendar app contains ready-made shortcuts for creating and managing occasions.

Preconfigured app shortcuts

With the App Intents framework, including these preconfigured shortcuts to your personal app is easy. They can be utilized instantly within the Shortcuts app or triggered hands-free with Siri. Constructing on the AskQuestionIntent we outlined earlier, we will now create a corresponding shortcut so customers can set off it extra simply. For instance, right here’s how we might outline an “Ask Query” shortcut:

struct AskQuestionShortcut: AppShortcutsProvider {
    static var appShortcuts: [AppShortcut] {
        AppShortcut(
            intent: AskQuestionIntent(),
            phrases: [
                "Ask (.applicationName) a question",
                "Ask (.applicationName) about (.applicationName)",
                "Get answer from (.applicationName)",
                "Use (.applicationName)"
            ],
            shortTitle: "Ask Query",
            systemImageName: "questionmark.bubble"
        )
    }
}

The AskQuestionShortcut adopts the AppShortcutsProvider protocol, which is how we inform the system what shortcuts our app helps. Inside, we outline a single shortcut known as “Ask Query,” which is tied to our AskQuestionIntent. We additionally present a set of instance phrases that customers may say to Siri, resembling “Ask [App Name] a query” or “Get reply from [App Name].”

Lastly, we give the shortcut a brief title and a system picture identify so it’s visually recognizable contained in the Shortcuts app. As soon as this code is in place, the system robotically registers it, and customers will see the shortcut prepared to make use of—no further setup required.

Testing the Shortcut

Shortcuts in Shortcuts app and Spotlight Search

To provide the shortcut a attempt, construct and run the app on both the simulator or a bodily iOS gadget. As soon as the app has launched at the least as soon as, return to the House Display screen and open the Shortcuts app. It’s best to now discover the “Ask Query” shortcut we simply created, prepared so that you can use.

The brand new shortcut not solely seems within the Shortcuts app however can also be accessible in Highlight search.

While you run the “Ask Query” shortcut, it ought to robotically immediate you for query. When you kind your query and faucet Executed, it brings up the app and present you the reply.

shortcut-demo-homescreen.png

Abstract

On this tutorial, we explored the best way to use the App Intents framework to show your app’s performance to the Shortcuts app and Siri. We walked by means of creating an AppIntent to deal with consumer enter, defining a preconfigured shortcut, and testing it proper contained in the Shortcuts app. With this setup, customers can now ask inquiries to the Ask Me Something app instantly from Shortcuts or through Siri, making the expertise quicker and extra handy.

Within the subsequent tutorial, we’ll take it a step additional by exhibiting you the best way to show the AI’s reply in a Dwell Exercise. It will let customers see their responses in actual time, proper on the Lock Display screen or within the Dynamic Island—with out even opening the app.

xcode – React Native iOS Simulator Reveals Clean White Display screen – Works High-quality on Android


Downside Description

I’ve a React Native challenge that runs completely on Android, however exhibits solely a clean white display when working on iOS simulator. When constructing and working via XCode, I can see the app launches however solely shows a white display.

Setting Particulars

  • React Native Model: 0.74.5 (upgraded from 0.69.3)
  • iOS Improvement Goal: 13.4
  • Node.js Model: v18.20.8 (through NVM)
  • Platform: macOS Sonoma (x86_64)
  • XCode: Constructing for iOS simulator
  • Hermes: Enabled () hermesEnabled=true

Console Logs from XCode

warning: (x86_64) /Customers/emres/Library/Developer/Xcode/DerivedData/mobile_1969-gfeqbzlnxklpkbamfxhvupxmknzj/Construct/Merchandise/Debug-iphonesimulator/mobile_1969.app/mobile_1969 empty dSYM file detected, dSYM was created with an executable with no debug information.

Invalidating  (mum or dad: (null), executor: (null))

Didn't ship CA Occasion for app launch measurements for ca_event_type: 0 event_name: com.apple.app_launch_measurement.FirstFramePresentationMetric

Didn't ship CA Occasion for app launch measurements for ca_event_type: 1 event_name: com.apple.app_launch_measurement.ExtendedLaunchMetrics

nw_protocol_socket_set_no_wake_from_sleep [C2.1.1:2] setsockopt SO_NOWAKEFROMSLEEP failed [22: Invalid argument]

Challenge Configuration

AppDelegate.mm

- (BOOL)utility:(UIApplication *)utility didFinishLaunchingWithOptions:(NSDictionary *)launchOptions
{
  RCTAppSetupPrepareApp(utility, false);
  RCTBridge *bridge = [[RCTBridge alloc] initWithDelegate:self launchOptions:launchOptions];
  UIView *rootView = RCTAppSetupDefaultRootView(bridge, @"mobile_1969", nil, YES);
  
  if (@obtainable(iOS 13.0, *)) {
    rootView.backgroundColor = [UIColor systemBackgroundColor];
  } else {
    rootView.backgroundColor = [UIColor whiteColor];
  }
  
  self.window = [[UIWindow alloc] initWithFrame:[UIScreen mainScreen].bounds];
  UIViewController *rootViewController = [UIViewController new];
  rootViewController.view = rootView;
  self.window.rootViewController = rootViewController;
  [self.window makeKeyAndVisible];
  return YES;
}

- (NSURL *)sourceURLForBridge:(RCTBridge *)bridge
{
#if DEBUG
  return [[RCTBundleURLProvider sharedSettings] jsBundleURLForBundleRoot:@"index"];
#else
  return [[NSBundle mainBundle] URLForResource:@"principal" withExtension:@"jsbundle"];
#endif
}

Podfile (Key Components)

platform :ios, '13.4'
set up! 'cocoapods', :deterministic_uuids => false

# Hermes enabled
use_react_native!(
  :path => config[:reactNativePath],
  :hermes_enabled => true,
  :fabric_enabled => flags[:fabric_enabled],
  :app_path => "#{Pod::Config.occasion.installation_root}/.."
)

Metro Config

const { getDefaultConfig, mergeConfig } = require('@react-native/metro-config');
const defaultConfig = getDefaultConfig(__dirname);

const config = {
 transformer: {
   getTransformOptions: async () => ({
     remodel: {
       experimentalImportSupport: false,
       inlineRequires: true,
     },
   }),
   babelTransformerPath: require.resolve('react-native-svg-transformer'),
 },
 resolver: {
   assetExts: assetExts.filter(ext => ext !== 'svg'),
   sourceExts: [...sourceExts, 'svg'],
 },
};

module.exports = mergeConfig(defaultConfig, config);

index.js Entry Level

import React from 'react'
import 'react-native-gesture-handler'
import { AppRegistry } from 'react-native'
import App from './App'
import { title as appName } from './app.json'
import { Supplier } from 'react-redux'
import { retailer, persistor } from './src/retailer'
import { PersistGate } from 'redux-persist/integration/react'
import ErrorBoundary from './src/elements/error/ErrorBoundary'

const Software = () => (


)

AppRegistry.registerComponent(appName, () => Software)

Key Dependencies

{
  "react": "18.2.0",
  "react-native": "0.74.5",
  "react-native-gesture-handler": "^1.10.3",
  "react-native-screens": "3.27.0",
  "react-native-safe-area-context": "^1.0.0",
  "@react-navigation/native": "^5.3.0",
  "@react-navigation/stack": "^5.3.2",
  "react-redux": "^7.2.0",
  "redux-persist": "^5.10.0"
}

Steps Tried

  1. Android: App runs completely – all UI elements and navigation work
  2. iOS Simulator: Solely exhibits white/clean display
  3. Clear builds: Deleted Pods, , ran pod set up Podfile.lock
  4. Metro cache reset: npx react-native begin --reset-cache
  5. Simulator reset: Erased all content material and settings

Questions

  1. Why does the React Bridge get invalidated instantly on iOS however work fantastic on Android?
  2. Is the dSYM warning associated to the clean display subject?
  3. May there be a problem with the improve from RN 0.69.3 to 0.74.5 affecting iOS particularly?
  4. Are there any iOS-specific configuration points within the present setup?

Any insights on debugging this iOS-specific subject could be enormously appreciated! Thanks upfront.

Leveraging Claude Code | Kodeco


The period of getting to copy-paste code from an AI chat tab into your code editor has come to an finish some time in the past. AI-powered coding assistants have develop into more and more refined, with instruments like Aider displaying how highly effective command-line AI integration may be for improvement workflows. As a draw back, these instruments usually require you to be taught particular instructions and syntax to speak successfully with the AI.

Claude Code builds on this basis with a extra intuitive method. As an alternative of memorizing instructions, you’ll be able to describe what you wish to do utilizing pure language.

Getting Began

Obtain the venture supplies through the Obtain Supplies hyperlink on the prime and backside of this web page. Subsequent, unzip the venture someplace for later use.

To observe together with this tutorial, you’ll must have the next put in:

With that taken care of, it’s time to take a more in-depth take a look at what you are able to do with Claude Code and tips on how to set up it.

What’s Claude Code?

Claude Code is an agentic command line device. That’s a flowery time period for a CLI program that may perceive what you wish to accomplish after which determine and execute the steps to do it, quite than simply operating one particular command at a time. As an alternative of getting to change forwards and backwards between your code editor and an AI chat tab, you’ll be able to delegate coding duties on to Claude proper out of your command line.

Claude introduces itself

Consider it as a wise assistant that may enable you to with something you want to do, with entry to a variety of instruments and assets. It’s designed to streamline your improvement course of by bringing Claude‘s coding capabilities proper the place you’re already working.

Organising Claude Code

Earlier than delving into the set up, you want to know that utilizing Claude Code isn’t free.

Claude Code wants both a Claude subscription or an Anthropic API key to operate. Should you can swing it, I’d strongly advocate getting an annual Claude Professional subscription — it’s far more cost-effective than paying per API name since Claude Code can burn via tokens shortly.

Undecided if Claude Code is price it? Seize an API key and cargo it with $10 in credit score. That’ll get you thru this tutorial with some tokens left over to experiment.

No matter possibility you go along with, the subsequent step is to put in Claude Code!

Set up

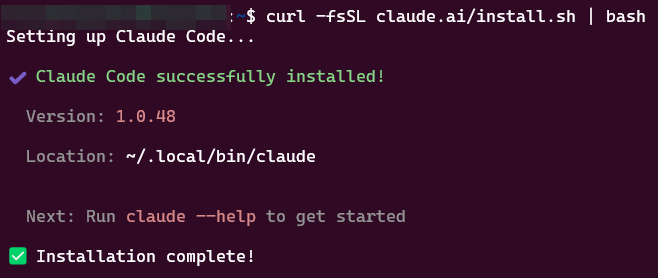
Open a brand new terminal window and run the command under to put in Claude Code:

npm set up -g @anthropic-ai/claude-code

You must see the next message after the set up is full:

Claude Code installed

Configuring Claude Code

If you run Claude Code for the primary time, it should ask you to set a colour mode, select no matter appears to be like finest in your terminal. After that, you’ll get requested on your login technique:

Choose login

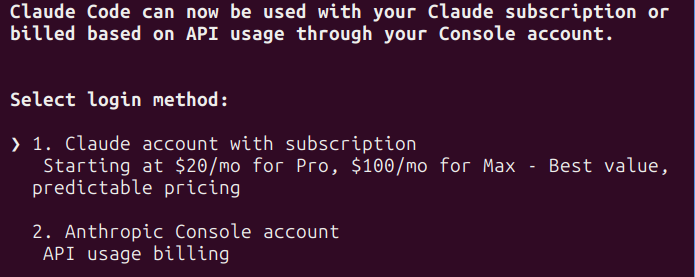
When you’ve got a Claude Professional or Max account, select possibility 1 right here and it’ll attempt to open an online browser to register together with your account. Should you favor to make use of your Anthropic Console account, select possibility 2 and enter your API key when requested.

Word: If the browser window doesn’t open mechanically, you’ll be able to copy the URL from the terminal and paste it into your browser manually to get the code. Copy that code and paste it again into the terminal when prompted.

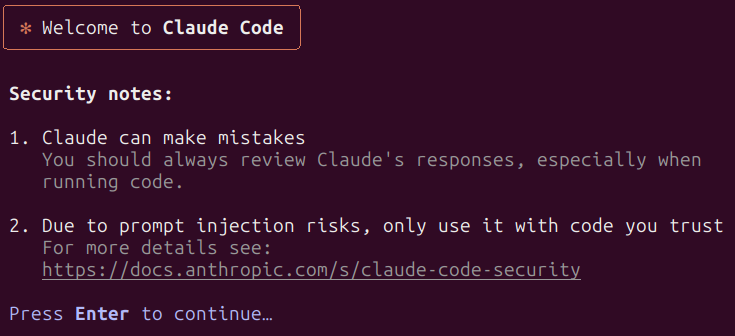
When you’re logged in, you’ll get a remaining disclaimer. Press Enter to dismiss it and also you’ll be good to go.

Claude disclaimer

If all went effectively, you need to see a field with a message asking you if you happen to belief the information within the folder just like the one under.

Run Claude

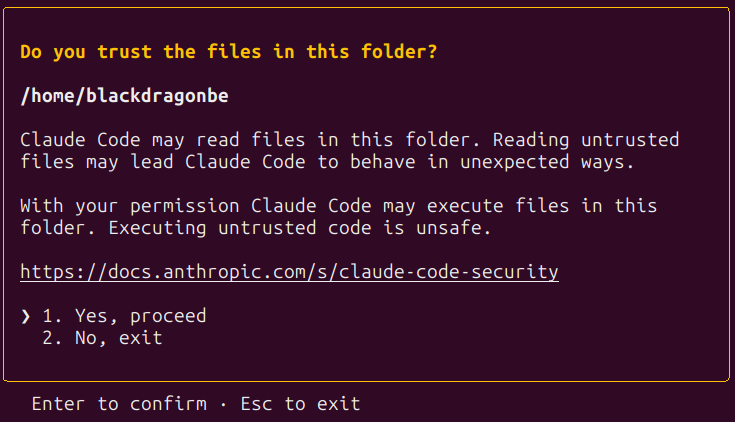
Select no for now and prepare to discover ways to use Claude Code.

Making a Venture From Scratch

To get your toes moist, begin by making a contemporary Python venture utilizing Claude Code.
Create a brand new folder on your venture and title it “hello_claude_code“. Open a brand new terminal in that folder and run the next command:

claude

If it asks if you happen to belief the information within the folder, select sure. You must now see the welcome message and a immediate enter.

Welcome screen

Speaking with Claude

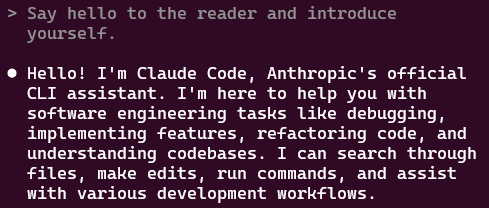
Now you can begin speaking with Claude Code. Sort your immediate and press Enter to ship it to Claude. For a primary immediate, strive saying “Hey”.

Saying hello

Claude will “assume” for a short time earlier than responding.
To get Claude to create a venture for you, copy and paste the next immediate into the terminal and press Enter:

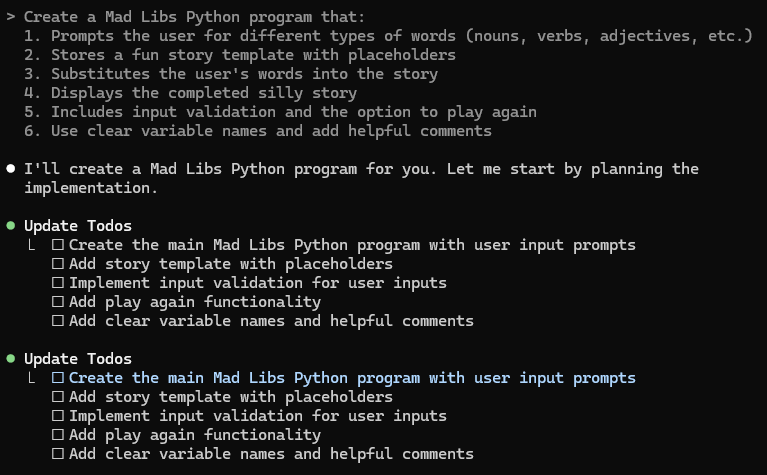
Create a Mad Libs Python program that:
1. Prompts the person for several types of phrases (nouns, verbs, adjectives, and so forth.)
2. Shops a enjoyable story template with placeholders
3. Substitutes the person's phrases into the story
4. Shows the finished foolish story
5. Contains enter validation and the choice to play once more
6. Use clear variable names and add useful feedback

Word: At all times be particular in your prompts, don’t anticipate Claude to learn your thoughts. For the most effective outcomes, add clear particulars and context. Brief and obscure prompts will end in less-than-ideal outcomes.

After a a while, the agent side of Claude Code will kick in. It received’t write code within the terminal simply but, however will as a substitute provide you with a plan of motion.

Mad Libs first prompt

If all goes effectively Claude will wish to write a file. It received’t do that with out asking on your permission, so that you’ll see the code it desires to jot down, adopted by a query just like the one under:

Claude asks for permission

You’ve gotten three choices right here:

  1. Sure: this can enable Claude to jot down this explicit file.
  2. Sure, and don’t ask once more this session: Claude will write this file and received’t ask you once more if it could write information.
  3. No: Claude received’t write the file and can watch for a brand new immediate.

Test if the code appears to be like good after which press Enter to proceed and select the default possibility for now, which is “sure”.
At this level you’ll be able to examine if the file truly exists within the venture folder.

File exists

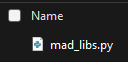
For such a easy venture, there’s a very good likelihood Claude will use a single file. If it does ask to jot down extra, reply with sure.
As soon as Claude is completed, it should write a abstract of what it has completed and directions so that you can observe up. I bought the next message:

Mad Libs done

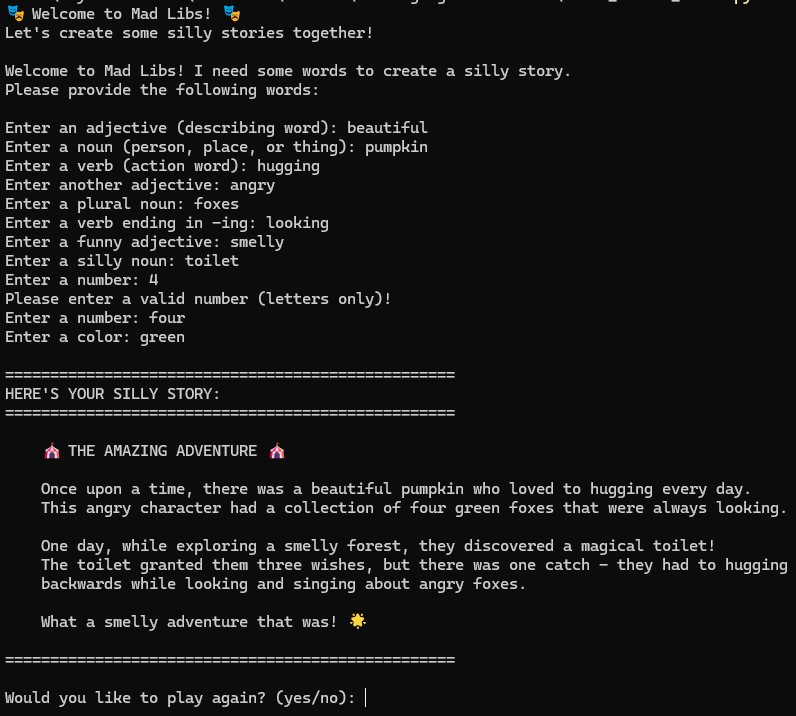
Attempt operating the venture as instructed and examine if every part works as anticipated. For me, it labored, and I bought the next output:

Mad Libs result

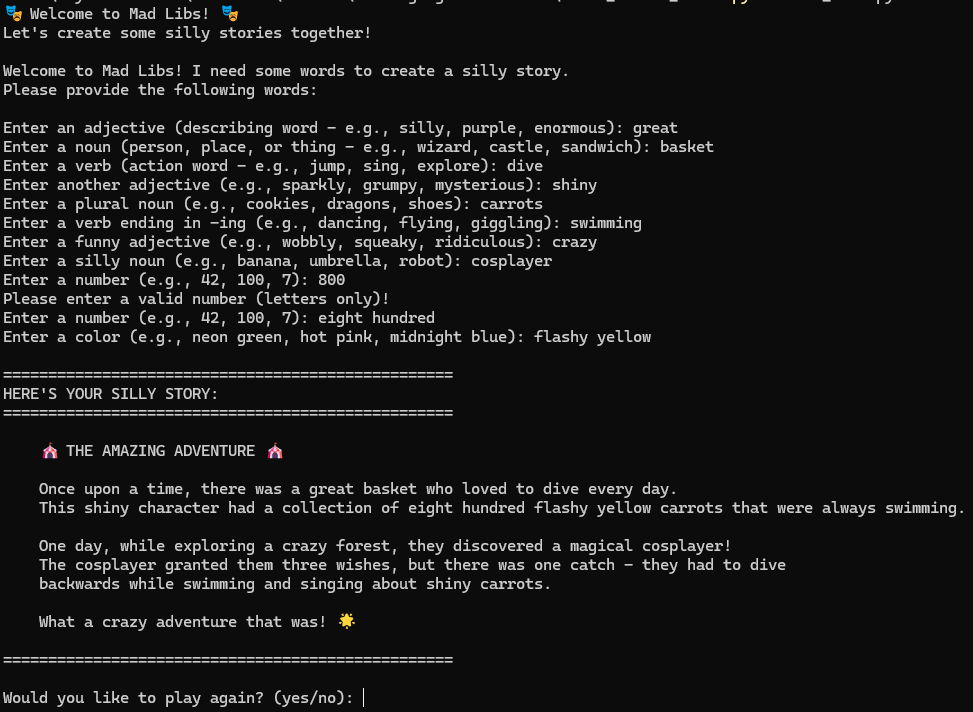
begin, however you’ll be able to refine it to make it higher. For instance, if you happen to thought it wasn’t clear what sort of phrases it needed, suggest so as to add examples to every phrase immediate:

Please add examples to every phrase immediate. It wasn't all the time clear what was anticipated of me. 

This time, Claude will ask if it’s okay to edit a file:

Update prompt

Select possibility 2 right here so future edits may be utilized with out having to ask you.
Now strive operating the venture once more with the enhancements in place.

Improved Mad Libs

This back-and-forth is key to working with Claude Code. Making gradual adjustments and iterating on the outcomes is an effective way to refine your code.

Shut the terminal window and prepare to dive deeper. Within the subsequent part, you’ll discover ways to work with present tasks and tips on how to get essentially the most out of Claude Code.

Cisco’s 9% safety development is misleadingly low


AI infrastructure forward of plan and rising

Cisco reported greater than $800 million in AI infrastructure orders from webscale clients within the fourth quarter, bringing the overall for 2025 to greater than $2 billion, which is over 2x what the corporate initially projected. It is a mixture of its personal Nexus switches, optics, AI PODs, UCS servers and Silicon One.

Success right here is essential for Cisco, as at one time, the corporate had subsequent to no enterprise with the hyperscalers. The event of Silicon One was pivotal in Cisco’s success with this viewers, because it’s given them market main value efficiency. Cisco has additionally cultivated a partnership with Nvidia and is the one firm to have its silicon built-in into the GPU maker’s Spectrum-X product.

There may be one other wave of enterprise coming for Cisco on this space promoting AI infrastructure to non-hyperscalers. Robbins talked about this: “The Cisco Safe AI Manufacturing facility with Nvidia supplies a blueprint for constructing AI-ready information facilities for enterprises, sovereign cloud suppliers and newly rising neocloud suppliers. We count on the sovereign AI alternative to construct momentum within the second half of fiscal yr ’26.”

AI will drive campus upgrades

Many of the focus of community development in AI has been within the information middle, as that’s the place the expansion has been. Nevertheless, the visitors agentic AI creates will drive campus upgrades as effectively. On the decision, Cisco confirmed a chart of visitors generated by chatbots pre and submit agentic, and it reveals Cisco is anticipating agentic to drive a constant stage of visitors that almost all networks will not be capable of deal with. Robbin defined: “Community visitors won’t solely enhance past the peaks of present chatbot interplay however will stay persistently excessive with brokers in fixed interplay.”

The affect of that is twofold. The bump in visitors will drive the necessity for the next performing wired and wi-fi community. Additionally, and perhaps extra importantly, because the AI brokers achieve autonomous decision-making and action-taking capabilities, pervasive safety can be essential to make sure they function reliably and safely. Cisco lately launched its Good Switches, which have built-in safety and may see a multi-year refresh cycle coming. Given campus is Cisco’s largest enterprise unit, a significant refresh right here can lead the corporate into sustainable, accelerated development.

The platform impact is taking maintain

One of many underappreciated facets of Cisco’s turnaround has been the corporate returning to its roots and turning into product led. This has been and continues to be the mission for the corporate’s newly appointed Chief Product Officer, Jeetu Patel.